


[…] of money. Screenr does have some limitations but for free I am sure you can work around them. This excellent tips guide is a must of you want to get the most out of the tool. Go on, try it out and comment on what you […]
How to Create Screencasts You Can Be Proud Of
October 13th, 2009A few weeks ago we launched Screenr, a free screencasting application that is easy to use and great for quick tutorials and elearning courses. I like it because it’s easy for me to quickly answer the many questions I get in the user community and through the blog. Not only can I answer the questions quickly, but I now can share those same tips with other blog readers and members of the community.
And it’s not just me doing the sharing. There are many others also sharing their tips and tricks. In fact, on the Word of Mouth blog, we compiled over 100 rapid elearning tutorials that have been created with Screenr since its launch. Check them out.

Screenr’s pretty easy to use. However, like any new application, the more you use it the more you learn a few time saving tips and tricks. Today, I’d like to share some tips and tricks that are going to help you create the best screencasts possible. While I’m focusing on Screenr, many of these tips are relevant regardless of your screencast application.
Prepare Your Environment
Your success begins before you start recording. You want good quality audio and the right work flow. This only comes with preparation.
- Record the best audio you can by using a good microphone. You can get a decent microphone for less than $100. And if you do a lot of recording, it makes sense to invest in a good one. Here’s an example of two different microphones on the same laptop in the same room: $30 headset and $72 desktop (with no pop filter or any other type of adjustment). You’ll notice that the headset microphone doesn’t sound as good. You also hear the pops of air and movement of the mouthpiece. That’s why I use a desktop microphone. It just sounds better, which most likely means less editing and retakes. Plus bad audio is worse than a bad screen.
- Control the ambient noise. Turn off the A/C and fans. Turn off the office machines. Sometimes you’ll pick up some noise or humming when the microphone is too close to the computer, speakers, or other electronic devices. If you have a lot of ambient noise, try screening it out by playing some music in the background while you record. No Metallica. Just something soft with no vocals.
- Get rid of distractions. Is there a flickering light overhead or one coming from a nearby electronic device? Does your chair squeak? Is your phone ringer off? Get rid of those things that might make noise, flash lights, or do something else to get your attention while recording. Put them out of sight while you record.
Prepare Yourself
It’s all about having a plan and executing it. Focus on what you’re going to say and make it brief.
- Have some water handy. I find that I do a lot of retakes on that opening line, so I tend to start and stop my screencasts. This causes my throat to get dry really fast. It’s easy for me to go from sounding like a smooth rapid elearning coach to Lauren Bacall in just a few takes. 🙂
- Get comfortable. Position your microphone and screen so that you’re comfortable while doing the recording. Two problems I always run into: I tend to lean into the screen which impacts my breathing. And my mouse runs out of room or gets tangled with other cords on my desk. These things distract me. And when I lose focus I mess up the recording; which means I have to stop and start over.
- Try to use less than 5 minutes. Screenr gives you 5 minutes. That doesn’t mean that you have to take all 5 minutes for the screencast. An ideal screencast is 2-3 minutes. If you find that the screencast is long, just break it into chunks.
General Recording Tips & Tricks
Good screencasters make it seem like they just press record and start talking. But that’s usually not the case. It just looks and sounds that way. Here are some general tips that will help you record better screencasts.
- Set up your screens. Do a quick walk through and make sure that everything you need is available. Many of my demos require that I jump from one application to another. I have them all open and sized to the record window so that when I go back and forth it looks seamless and flows well. I also make sure that all of my assets and files are easily available.
- Supersize! Sometimes the screencasts are of a larger resolution and get scrunched down to a smaller window, which means you might lose some detail. To help make things more visible, you can increase the font size, make your icons bigger, and even increase the size of your mouse arrow. Sometimes I’ll change the resolution of my computer and do a full screen capture at a lower resolution. When I bring it back up, it looks great and I was able to leverage a full screen for the capturing. Play around with some techniques that work for you.
- Get right to the point and stick with it. A good habit is to have an opening line that states what the tutorial or screencast is about, and then jump right into it. You only have a few minutes and you want to make it flow well and not bog it down with a bunch of chatter or dead space where you’re talking and the screen shows nothing new. If you do have to explain something, create an image you can jump to with some text on it. I like the way, David Anderson does that in this screencast on audio settings.
-

- Tell the viewer what they should be looking at. You only have a few minutes and most likely the user is a little slower following you because they don’t always have the same context and can’t anticipate where you’re going. It’s easy enough to follow the mouse, but make sure to point out what they should be looking at when you change screens or focus on a new area. This is especially true if you’re doing things they can’t see like using a keyboard shortcut.
- Get rid of the visual noise. The learner can only see what you show. There’s no need to show some stuff that could conflict with your message. Frame your recording window only around what’s important for you to share the information. If you have to do full screen videos where you show your desktop, try a product like Stardock’s Fences. It’s free and can quickly hide your icons while you do your recording. Here’s a tutorial to show how to use Fences to hide your desktop icons.
- Hide personal or proprietary information. If you find that you’re doing a lot of screencasts, then create another user account on your PC. Just use the default settings and folders. When you do screencasts from this account you don’t need to worry about hiding personal information like folders or toolbars in your browser. I’d also make your desktop image a solid color rather than a distracting background image. You can also try a virtual desktop. Set one up just for screencast videos. Here’s a demo of how to use a virtual desktop.
- Control your mouse movement. I have the habit of moving my mouse back and forth while I talk. This is both annoying and distracting to the viewer. If you do the same, take your hand off the mouse while you’re talking so you don’t drag the pointer all over the place. When you do move the pointer, make sure to guide the viewer’s attention so she understands where you’re going.
Extra Screenr Tips
Here are some recording tips that are unique to Screenr.
-
-
- Create interesting thumbnails. In Screenr, the first frame of the screencast becomes your thumbnail and visual cue. Use that to your advantage. Consider how you start your video. One trick is to start with the final output. Tell the viewer that this is what you’ll create and then jump to the tutorial and a different screen.
-

-
-
- Select the right aspect ratio. You can capture any size screen. However. Screenr does come with some default settings that work well in your rapid elearning courses. For example, 720×540 is the aspect ratio for a PowerPoint slide. 980×560 is perfect for videos in the no sidebar view mode in Articulate Presenter.
-

- Use pause (Alt+D) to create screencasts that flow well. If you find that you have to click on buttons and open other screens during your demos, then you want to use Alt+D to pause your recording between mouse clicks. This will let you set up your screens and create a faster screencast that will look more polished. Here’s a demo where you can see the difference and how much nicer it looks using the pause feature.
Click here to view the Screenr demo.
- What message does your avatar communicate? Nothing tells people you’re an amateur than by using the default avatar that comes with Twitter. At the same time, you want your avatar to communicate the right message. In most cases, you’re probably better to err on the side of conservative than going with a wild avatar that confuses or offends your audience.

See These Tips in Action
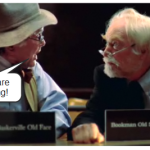
We created before and after versions of a simple screencast. Watch both and see if you can tell the differences. Not only is the after version a big improvement, it also takes a lot less time.

- Before version:
sloppy and distracting - After version: clean and focused
Do you have any tips to help make screencasting easier and better for the learners? If so, feel free to share them in the comments section.
Events
- Everyday. Check out the weekly training webinars to learn more about Rise, Storyline, and instructional design.
Free E-Learning Resources
 |
 |
 |
|
Want to learn more? Check out these articles and free resources in the community. |
Here’s a great job board for e-learning, instructional design, and training jobs |
Participate in the weekly e-learning challenges to sharpen your skills |
 |
 |
 |
|
Get your free PowerPoint templates and free graphics & stock images. |
Lots of cool e-learning examples to check out and find inspiration. |
Getting Started? This e-learning 101 series and the free e-books will help. |
You might also like:
43 responses to “How to Create Screencasts You Can Be Proud Of”
Thank you for the microphone demo. I’ve been stewing about headset vs. stand alone. It convinced me to go stand alone.
Jim
Don’t think anyone can get clearer or as helpful as you on being so professional about it. There’s a lot of bad stuff around and you’ve hit the nail on the head about what to avoid or check before starting. Your comment about mic and backround noise is vital, not to mention all the mouse twiddling ;-). Also like advice about privacy.
@Jim Taylor: I just purchased a desktop microphone. It was a tough choice between the Samson G-Track & the Blue Snowball. I went with the G-Track for a few reasons: multiple adjustments right on the mic, ability to monitor the recording with no latency (processing delay) & it just looks cool! What a huge difference the new mic makes. My voice no longer sounds like I’m talking through a glass of mud!
@Tom: I’d love to try Screenr but Twitter is trapped out of our network. Our IT have yet to be convinced of the value of social media. None-the-less keep up the great stuff. I look forward to the weekly blogs.
–Allen
As always you give great tips and they apply regardless of the application you’re using.
I have to say, I love my Logics headset mic. It produces great sound.
Another tip for preparing your screen. If your screen recording should also include the Windows Start Bar….right click in the notification area of the start bar and choose “properties”. On the task bar tab, in the “notification area” section near the bottom uncheck “Show Clock” and then click the customize button. Here you can set programs to “Always Hide” icons. This will remove everything from the notification area so it doesn’t distract your audience.
Thank you for the tips. They are very helpful. We use professional studio and narator to record elearning courses. We will now try to use these tools to reduce cost and have the same quality.
I look forward to your blogs.
I tried Screenr for the first time last night and I was very impressed with how easy it was to use. Here is a neat thing that I discovered while playing with it:
You can open your webcam while recording and have a video of yourself in the screencast. This may be a fun way to add a personalized introduction or conclusion. I posted my Screenr screencast on how to do this here – http://minutebio.com/blog/2009/10/12/using-screenr-to-create-a-video-post/
Thank you Articulate for providing this easy to use, and free, tool. And that it sends the screencast out as a Tweet is fantastic too.
Jeff
We are in the same boat as Allen W. in regard to not being able to use Screenr due to Twitter being blocked by IT. I noticed that I can now record a Screenr video (previously I couldn’t when it first came out), but I can’t save it to my computer because of Twitter. I would really love to use this instead of the competition for creating screen-captures. Is there any way that they can allow non-Twitter audiences to create and save the Screenr videos locally to our own PCs for elearning purposes without needing a Twitter account? This method shouldn’t cost them anything more in resources (server space, etc.). Thank you for all your great articles!
Great tips!
Here is mine. Take of your watch or bracelets, if you are wearing them, and clip your nails short. This reduces noise when you have to us the keyboard.
Tired of re-starting a screen cast over and over because that first line just doesn’t work right? Write a script.
When you write, you can try out all the different openings on paper (or screen) without getting the Lauren Bacall voice.
When you write a script, write concisely, but try to keep it sounding like it isn’t scripted… then practice a few times (sub-vocally) so it does not sound like you are reading.
A script helps me remember all the things I wanted to say, helps me remember all the right words, and allows a grammar checker to look over my shoulder to make sure I am not wording things poorly or using slang or jargon.
It may seem like it takes longer to script a screen-cast in advance, but it is like any other job – the more prep work you do, the faster the actual production part happens.
Resizing a screencast so it fits in your blog post column is fairly important. http://bit.ly/LxNWb.
I think it is important that screencast does not overflow into other blog columns.
Tom – I love it that you prep each window and size them perfectly–me too. In fact, I start with the first screen as small as possible and grow slightly larger as I go just to make sure each shot looks crisp (without any strange border peeking around the edges. Once I got it, I do a dry run and then record it. It’s easy enough to re-record!
I love the ease of Screenr. But I have a problem. My playback has a pixelated box where my tablet pen touches. Anyone experience this? I’ve played around with screen sizes and pen sensitivity. Is it a Java issue? I’ve even rebooted in case it was some weirdness somewhere.
Mic use: I have an old desk-top, stick-type mic, likely one I got with Dragon many years ago, and just record using the audio recorder function that comes in Windows. To help shield from ambient noise, I slipped the mic inside a foam can gripper/koozie. (use a soft one that retains its cylindrical shape, not the neoprene ones that collapse or fold flat) I initially learned this trick using a styrofoam cup, but even with a snug fit, the styrofoam has a tendency to squeak if moved even slightly. I expect it looks a bit silly speaking into a “Port ‘o Subs” can gripper, but it was free and does an OK job.
I set the recorder at the highest sampling rate it offers, then when I edit, I can downgrade the sample rate to strike a balance with acceptable file size. This recorder is limited to 1 minute recordings, but that’s OK since it makes them easier to edit in small segments, then string them sequentially for playback.
[…] trenger noen gode tips til hvordan man lager slike videoer – og for et hell; i dag publiserte The rapid elearning-blog nettopp en slik liste, og med eksempler. Jeg har derfor oversatt (fritt som vanlig) og gjengir […]
Wow.. what a great posting. Thank’s a lot for knowledge sharing. Two thumbs up. Nice to know you ^_^
[…] How to Create Screencasts You Can Be Proud Of » The Rapid eLearning Blog – […]
Great tips. I really need to get a good microphone eventually. And I strongly second the point about drinking water.
Finally, I want to suggest a free tool called OmniDazzle. It’s a little mouse pointer and highlighter for your desktop. It’s a little tricky to work with for screenr screencasts, because Dazzle has to be in the forefront in order to use it, but it does work. And it’s free. Here’s my screencast about it: http://screenr.com/IPs
Another excellent post. Now I think I will be very proud of creating screencasts.
For Windows XP users, here is another trick for clearing the desktop of clutter to give a clean slate for recording screencasts. It may work on other Windows versions as well, but I am not certain.
This is especially useful if you can’t use the virtual desktop software due to IT software restrictions:
1. Switch your wallpaper or background to the solid color you want to use.
2. Right-click on the desktop. Under Arrange Icons, uncheck the Show Desktop Icons option.
3. Give it about 10 seconds and your icons are hidden.
4. Repeat the process to bring them back after you are finished…
Combine this with the previous comment on how to hide the clock and system tray icons, and you have accomplished a clean slate for screen recording…
@ Tom – Thanks for the great posts, as always…
I’m bad at screen casting… I disabled my audio cause I suck big time with my English! I’m still sick with my voice so I discontinued my blog… anyway nice tips
[…] How to Create Screencasts You Can Be Proud Of » The Rapid eLearning Blog (tags: screencast powerpoint howto tools e-learning screencapture) […]
[…] How to Create Screencasts You Can Be Proud Of » The Rapid eLearning Blog […]
[…] Tips (Engelstalig) hoe je een goede screencast moet maken, met ter illustratie een screencast waarbij de tips niet, en een waarbij de tips wel opgevolgd zijn; […]
Mouse Location Tip: When you switch screens and think the learner may lose where the mouse is, call attention to it using the CTRL key. Here’s how to set this up (Windows XP): Control Panel > Mouse > Pointer Options. Select “Show location of pointer when I press the CTRL key”. Works great! Thanks, Tom, for another great post!
[…] How to Create Screencasts You Can Be Proud Of, October 13, 2009 – 17 tips on making screencasts better for your viewers and easier for you […]
[…] How to Create Screencasts You Can Be Proud Of » The Rapid eLearning Blog […]
I got back to this post now I am starting to create screencasts of my own. I was wondering what is the most practical way: add audio later or do it right away during the recording… I’ve restarted my recordings a thousand times because I messed up somewhere so I leaning towards the ‘add later’ part.
[…] How to Create Screencasts You Can Be Proud Of, October 13, 2009 […]
Hi Tom,
I truly enjoy your blog and have learned so much from you.
Can you tell me how do I embed the screen casts on to the forum as a part of the screen like you do, and not as a link? Is this function controlled by the administrators of the website or something I can change on my own?
[…] How to Create Screencasts You Can Be Proud Of […]
Great tips but you haven’t written tips on how to edit and do final tweaks. Sorry for being lame but being a non technical person its not easy for me.
[…] […]
[…] het blogartikel van Tom Kuhlman vind je onder het kopje: “See these Tips in action” twee voorbeelden van […]
[…] het blogartikel van Tom Kuhlman vind je onder het kopje: “See these Tips in action” twee voorbeelden van […]
[…] took this opportunity to re-read a post by Tom Kuhlmann: “How to Create Screencasts You Can Be Proud Of” where he gives great tips, as always. There’s a funny screencast at the end of the […]
[…] het blogartikel van Tom Kuhlman vind je onder het kopje: “See these Tips in action” twee voorbeelden van […]
[…] How to Create Screencasts You Can Be Proud Of » The Rapid eLearning Blog […]
[…] http://www.articulate.com Use pause (Alt+D) to create screencasts that flow well. If you find that you have to click on buttons and open other screens during your demos, then you want to use Alt+D to pause your recording between mouse clicks. This will let you set up your screens and create a faster screencast that will look more polished. Here’s a demo where you can see the difference and how much nicer it looks using the pause feature. Select the right aspect ratio. […]


0
comments