


I use most of the same methods you. But I’d like to be able to attach the source link and CC attribution to the image file.I often want a similar image and would like to easily find the Flicker photo stream of the contributor. Maybe you can talk about that in a future post. Thanks.
FAQ: How Do You Manage the Graphics in Your E-Learning Course?
April 24th, 2012
I’ve been on the road a lot lately doing elearning workshops and Articulate jam sessions. After the sessions I usually get some really good questions that are probably common to many of us. Today, we’ll look at how to manage the images used in elearning courses.
Essentially there’s no right or wrong way to manage your images. Do what works best for you and your team. Here are a few ideas:
Be Consistent in How You Manage Course Files & Assets
We can waste a lot of time looking for images and assets that are spread across multiple computers and network drives. To help alleviate that, I start each elearning course with a generic folder. It already has a predefined project structure so I’ll always know where my image files are located regardless of the project I access.

When I start the project, I duplicate the generic folder and title it with the project name. After that all of my assets and project content go into the proper folders. This helps make the process consistent which comes in handy if you share files with others
You can get more detail in this blog post on organizing your elearning project files. There’s even a quick workshop tutorial that explains it in a bit more detail.

Click here to view the tutorial.
Use a Photo Management Application
Picasa or Windows Live Photo Gallery (both free) will scan your hard drive and locate images. They create a nice panel of thumbnails.
I like these programs because the thumbnails give me a quick visual reference of the images and then simple access to folder. And I can tag the images so they’re easier to search and locate later.
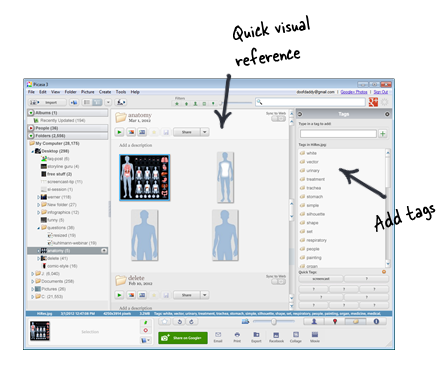
It takes a little time to get the images tagged, but once done, you’ll save a lot of time looking for what you need.
I usually start by tagging based on the project name. This keeps it simple. I find I don’t access the images that frequently after the project’s done so no need to go overboard initially. Over time I add more details to the images as I get to them.
Another bonus to these products is that they do some simple image editing. Check out the Photo Fuse feature in Windows Live Photo Gallery (could the name be a little longer please). It’s pretty slick and could come in handy if shooting your own stock photos.
Microsoft’s Clip Organizer Does Everything You Need
Almost everyone has access to Microsoft’s Clip Organizer, but we rarely use it. However, it lets you easily organize and manage your elearning assets. And it’s free.

I like that the Clip Organizer already does a lot of the tagging because it pulls from the project folder and file name. If you get in the habit of adding descriptive titles and folder names, you will make tagging and locating your images super easy.

Here’s a previous post where I discuss how to save time when working with elearning graphics. There are also three tutorials that show how to get more out of the Clip Organizer. For quick access to the Clip Organizer, I added a shortcut to my desktop.
One of the things I like about the Clip Organizer is that it’s not limited to Microsoft applications either. I can drag and drop the images to any other application that uses them.
Manage Your Image Files After the Fact
Most of the times when I look for photos that I’ve used in the past, it’s always based on a previous project. For example it’s less, “I need a guy in a business suit” and more “I used a guy in a suit in that finance course. We can use that image.”
The problem is that I have to dig through the previous course assets to find the image. Sometimes the image folder contains a lot more images than the ones I used. It would be great to just have a folder with ONLY the images used in the final course.
That’s possible! In PowerPoint 2007+ you can unzip the .pptx file; and inside the PowerPoint file folder you’ll locate a media folder. This media folder has all of the images used in your PowerPoint file.
Pull the media folder out and save it with the course name. Now you have a single media folder with the course media assets. So you’ll always have quick access to only the images you used in your rapid elearning course.
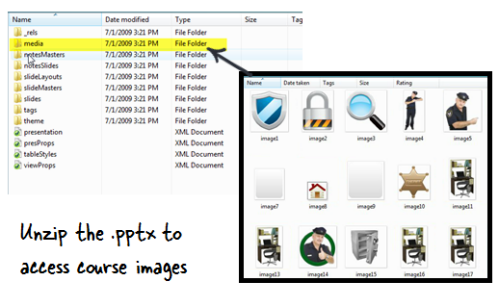
I use 7-Zip which is a free application that lets me extract the contents of the PowerPoint file. You can learn more in this blog post on unleashing your elearning graphics in PowerPoint 2007.
Here’s a simple tutorial where I walk through the process in more detail.

Click here to view the tutorial.
I’ll have to be honest. When I work by myself, I don’t always follow my own advice. And it always comes back to haunt me because somewhere down the road I have to share the files with others. So getting in the habit of managing your files is a good thing that will save time and frustration.
There are all sorts of ways to manage your files. Regardless of how you do it, the key is consistency and agreeing on a process that works for you and your team. The less it intrudes on how you work, the more success you’ll have.
How do
you manage the graphics you use in your courses? Feel free to share your thoughts by clicking on the comments link.
Events
- Everyday. Check out the weekly training webinars to learn more about Rise, Storyline, and instructional design.
Free E-Learning Resources
 |
 |
 |
|
Want to learn more? Check out these articles and free resources in the community. |
Here’s a great job board for e-learning, instructional design, and training jobs |
Participate in the weekly e-learning challenges to sharpen your skills |
 |
 |
 |
|
Get your free PowerPoint templates and free graphics & stock images. |
Lots of cool e-learning examples to check out and find inspiration. |
Getting Started? This e-learning 101 series and the free e-books will help. |
19 responses to “FAQ: How Do You Manage the Graphics in Your E-Learning Course?”
[…] View post: FAQ: How Do You Manage the Graphics in Your E-Learning Course? » The Rapid eLearning Blog […]
This topic idea isn’t very sexy….but it is super important! I am starting a huge project that will use Articulate for 50 *slightly* different presentations. So having a stable and constant file system is critical.
Does anyone know software that can will create a graphic image of a computer’s file system/structure? I am giving a training next week about how to edit our presentations and navigate our shared server data drive and I’m going to need to explain the file structure/system. I am going to draw out the file folder system by hand unless anyone knows a program that will create a graphic image for me.
Nice suggestions! We do the same sort of thing here with a template directory structure. One hard lesson learned at my shop – using symbols or special as part of a file name might cause them not to be picked up by backup programs like Carbonite. Make sure to test before implementing this as a standard.
Good stuff, Tom.
I organize folders pretty much the same way, with one addition. I add a folder called “XX – Hold for Delete.”
During the project, previous drafts, old storyboards — all the stuff that’s generated through the building and revision cycle, gets dropped there instead of into the recycle bin.
This helps me keep the working folder free of clutter, yet provides some protection if I ever have to go back to the older stuff.
The “XX” just ensures that the folder is always in the same place – last – in the directory tree.
When it comes to organizing files and the folder structure, the method I use is to add numbers to the front of the folder name instead of special characters. I personally like my Archive folder to be on top so it’s labeled 00_Archive. If I wanted it at the bottom I’d use 99_Archive. I number the other folders 01_Images, 02_Audio, 03_Video, etc. This way I can control the list without depending solely upon alphabetical order.
[…] on http://www.articulate.com Share this:TwitterFacebookMorePinterestTumblrStumbleUponRedditDiggLinkedInPrintEmailLike […]
Thanks for another great nuts-and-bolts article, Tom. My project files are organized similarly. I do have another folder: source. I do a lot of my own image, audio, and video creation. I keep the source files in their native formats in the source folder.
Thanks, again!
Howdy,
Great presentation.
This is off topic but how did you make full use of the presentation area for the demonstration? This could be 101 but I have never seen it before and I like it.
Cheers,
Dan
As a newbie to the area of eLearning development, your article will be invaluable.
[…] FAQ: How Do You Manage the Graphics in Your E-Learning Course? […]
So just how did you capture your on-screen activities for this presentation?
I’m still learning & becoming more comfortable narrating & annotating still screen shots, but the active screen capture + narration you did here could be really useful for training on certain tasks. I could also probably save a considerable amount of time spent managing animations.
Thanks again for more useful insight!
Dave
Thanks again for more useful insight we are larnig so abut many in Tithe then so also…………….. like


0
comments