


Tom – I’m going to be sure not to share this post with my boss. She’ll think I magically developed new design skills! 🙂
See How Easily You Can Design a Consistent Look for Your E-Learning Courses
September 6th, 2007
My kids love stickers. They plaster dozens of random ones on a page and proudly give me their new work of art. This approach to graphic design is fine for your family, but you don’t want your elearning courses to look like cluttered and random creations developed by sticker-happy children.
Get Rid of the Clutter
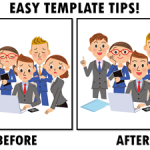
In this post, you’ll discover how to use your clip art to create images that are consistent and look like they belong together. Let’s get started by looking at the image below.

My guess is that you’ve seen this type of screen before. This elearning course looks kind of sloppy and unprofessional. It’s a cluttered design and the images don’t look like they belong together. This is not want you want for your course.
You want your screens to be less cluttered and have a consistent look and feel.
When you’re on a budget and have limited access to graphic resources, you need to be creative. If you’re forced to use clip art, odds are that you don’t have enough or the right ones. In the previous post, Little Known Ways to Create Your Own Graphics Using PowerPoint, we looked at ways to easily take Microsoft Office clip art and create your own images.
Now, let’s apply those techniques to create a consistent look for an entire elearning course.
Ungroup Free Vector Images
Microsoft stopped providing clip art but you can still use the same ideas by ungrouping vector images in PowerPoint.
Here’s what to do:
- Download all of the images to an open PowerPoint file.
- I like to spread the images out over a series of slides so that I can easily see them. I can fit quite a few on one slide.
- Save the file. This way you always know what style it is and you can easily access all of the images to edit them.
- Once you have the images saved, use the technique that I described in the previous post and create custom images.
Here are some additional tips:
- Don’t be afraid to play around and see what happens.
- You can change heads (or other body parts) on the characters.
- If you need a specific ethnicity, change the skin color or eye shape.
- Modify the clothes. You can change the colors or get rid of the “business look” by taking out the ties and white shirts.
Before & After Examples
I’ve included some before and after examples to whet your appetite. By applying my surgical expertise, these two images become a visual metaphor for chasing profits.

The image below demonstrates what we learned from the previous post. I ungrouped the image, took out what I didn’t need, and changed the color of her outfit. She went from being a soldier to a happy college student.

There’s no reason why you can’t mix and match body parts or facial expression to get the exact pose or look you want. All you need is a blank face, and you can drop any expression you want onto it.
In fact, I’ll go through all of the images from a style group, pull out the facial expressions, and put them on a blank slide. This way I have quick access to the expressions I need.
Here’s a quick way to create images for your next pirate rehabilitation course.


The image below is a combination of the same style. I changed the map reader from male to female using the hair and body shape from the original female image.

When you use the same style, it is easy to create images that meet your specific needs and look like they belong together. I
t’ll make your project look that much more polished and professional.
Here is a quick makeover of the first image above. I modified the images and then I cleaned the screen up a little. This is a simple example. Combine this technique with some of the presentation concepts popular in books like Beyond Bullet Points and you can really create a powerful and effective elearning course.

I look forward to seeing what you’re able to do. Next time, we’ll look at some simple ways to jazz up the images with a photo editing program.
Events
- Everyday. Check out the weekly training webinars to learn more about Rise, Storyline, and instructional design.
Free E-Learning Resources
 |
 |
 |
|
Want to learn more? Check out these articles and free resources in the community. |
Here’s a great job board for e-learning, instructional design, and training jobs |
Participate in the weekly e-learning challenges to sharpen your skills |
 |
 |
 |
|
Get your free PowerPoint templates and free graphics & stock images. |
Lots of cool e-learning examples to check out and find inspiration. |
Getting Started? This e-learning 101 series and the free e-books will help. |
You might also like:
52 responses to “See How Easily You Can Design a Consistent Look for Your E-Learning Courses”
Very nicely done, sir. Very nice, indeed. I enjoyed this post thoroughly.
Regards
Shane
Wow, Tom, your stuff just keeps getting better and better! I thought I was a whiz at squeezing a little goodness out of typical, trademark PowerPoint crappiness, but you are revealing me as the complete amateur that I am.
Keep up the great work!
You are truly amazing! I had no idea of all these possibilities. I won’t be sharing this post with my boss either!
Maureen
I get dozens – nay, hundreds – of these kinds of professional training emails in the course of my work week. This is the one I print and save and share with colleagues. At last, concrete tips that I can actually put into practice!
I’ve been doing this for years now, but MS doesn’t make it very obvious that you can search by style #, surprise, surprise. I’m sure this will relieve a few headaches now that everyone knows!
Hi T,
I could never do this. It is simple spectacular. You are truely creative
What a fun way to spend some work week! You’re providing great stuff to archive and share with clients.
Super tips and tricks Tom. Am very impressed by your creative thought. Look forward to your blog and yes the printer here is humming.
Thanks
Ann
Tom,
Who needs a designer when we have such a great tool!
I’ve been doing some “creative” work my own and will send one of my results. Time REALLY passes fast when you work on something like this!
Thanks!
Hi Tom,
First thanks for such a wonderful and enjoyable rapid e-learning blog.
Also, thanks for giving us some wonderful tips on how to customize (or mix) our Clipart using the “Grouping” feature in PowerPoint. I have even illustrated a sample graphic creation in my blog, which can be accessed directly from here 🙂
http://zaidlearn.blogspot.com/2007/09/rapid-e-learning-blog-practical-fun.html
“Your rapid e-learning blog is simply juice to my learning tummy!”
Warm Regards,
Zaid
Dear Tom,
I love doing new things with Power Point.
Here is an example:
http://www.transferbigfiles.com/Get.aspx?id=644db2b1-2460-44ec-a711-a122265bb6d5
Thanks again for the great tip!!
Tom – great information! Question: if the images do not ungroup, what program are you using to edit the images?
I like to find tips or idea on the internet but the best to find peaple from anothr world sharing together the tips and ideas thanks tom.
Tom:
Thank you for a truly useful, genuinely enlightening series of articles. If you are compiling an email list—and I can only assume you are—please add my address to it. I would welcome any announcement of information you care to make available. Dennis
Hi Tom,
My hats off to you. I never found in my life such an expert e-learning professional with a great conceptualization and visualization capabilities. Before reading this blog I never took PowerPoint so seriously.
You indeed are a genius.
Regards,
Saurabh Gupta
Thanks! What a great tip! This is a really helpful blog for me as I’m beginning the eLearning beta-test project for my organization. We’ve purchased a few licenses of Captivate, but Articulate may be the solution I like best. Thanks for these tips!
[…] 2.
Has something changed? When I type in these clip art styles, I am not getting any hits. When I go in properties, I am not geting a style number. Help?
-Abby
Hello Tom –
Excellent website. Fabulous tips !
Could you please tell me how to download pictures from the windows free clip art site. There is no option to download there. Also I tried ungrouping one of the images available in the clip art, it doesn’t highlight the ungroup option.
[…] more about this in Tom Kuhlmann’s post here. © Sumeet Moghe, […]
You are great, and the information is priceless.
Thanks
Hi Tom,
Few months back you have mentioned a tool to draw custom characters. It is online tool available.
Some how I am not able to recollect the name nor able to find the book mark. Can you please let me know the name of the tool?
Cheers
Nilesh
Tom-
You seem to use Microsoft clip art a lot. I am confused about the copyright on this clip art. Can it be legally used in a project that, though maybe elearning, is clearly commercial? And what about after the clip art is modified?
Thanks
What are the copyright issues associated with using ClipArt from MS Office Online? Can they be used commercially, or is this a breach of the MS copyright?
You say to “Download all of the images to an open PowerPoint file.” Can you explain how you do this? The only option I get with Microsoft Online is to download to the Clip Art Organizer. Then the organizer won’t let me search by style number. I started adding the style number as a keyword, so that I can search for them, but first I need to find all the files I downloaded!
Thanks!
Hi Tom.
Just wanted to thank you for the excellent material that you have on your blog. It’s been a great complement to my MS in Instructional Design & Technology program at Cal State Fullerton.
Cheers,
Jeremy
Great tips and tricks! Thanks for sharing!!
[…] See How Easily You Can Design a Consistent Look for Your E-Learning Courses […]
[…] a post that shows you how to create a consistent look for your courses. It covers some of what I’m talking about today. I also created a video that […]
I would like to learn about improving my templates for training.
thank you.
Very helpful, thank you. Is this possible in Office 2003?
Hi Tom,
great work. Am starting out in eLearning (self taught), your blog is one of the best I’ve seen.
thank you very much
Thanks for the useful tip – great one. And love your sense of humor with the pirate man. Ha!
Tom,
I just stumbled across this post and when I started looking for some clip art, I have noticed that microsoft has changed what they display in the properties – it doesn’t look like they include the style information anymore. Have they put that info elsewhere or are we stuck just trying to find the ones that match?
Thanks!
PS – love this blog – it has given me some great ideas for my courses!
Tom – when you say “download all of the images (for a style in Microsoft Office clip art) to an open PowerPoint file” . . . is there a secret way to download them all at once? Or are you doing this one by one – that seems tedious. Not that I wouldn’t try it if there’s no other way. I’m just hoping there’s a faster way.
Thanks – love the blog!


0
comments