

[…] Traduzione autorizzata tratta dal post originale di Tom Kuhlmann sul “Rapid E-Learning Blog”. Il post originale è disponibile qui […]
Here’s a Simple Screencasting Tip That Will Save Time & Frustration
April 10th, 2012
I get a lot of requests for software demos and quick tutorials. I also do quite a few webinars. Because of this, I am always figuring out just the perfect screen resolution for my software applications.
Another challenge is that most screencasts are recorded at a higher resolution than used in the elearning courses. You may record a full screen demo and then have to squeeze it down to something like 1024×768. And any time you scale a screencast down you’ll run into some image degradation.
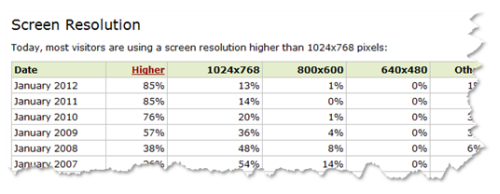
The good news is that as monitors get bigger scaling down won’t be as much an issue. As you can see in this post, 85% of the monitors have a screen size larger than 1024×768.
Ideally we can scale the software down to the desired recording resolution. But that’s not always possible. Some software has restrictions on how much you can scale the window down. They do this because if you scale too much the user interface gets messed up and makes it difficult to use.
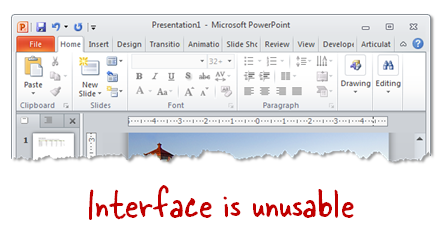
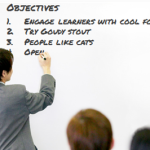
Above is an example of a PowerPoint screen scaled down to fit in a small recording window. As you can see, the user interface is trashed. While the software is functional it is not what the end user sees when they open up the application.
I have similar concerns when I do webinars and share application screens. During those I have to determine the best size to share the software. I like to keep the size of the applications the same. This way when I am switching between applications it’s as seamless as possible and the person watching the webinar doesn’t have to resize the viewing window.
Following is a simple trick that I use to quickly get my various software applications to the right size whether I’m doing a screencast or webinar.
Create an image file that represents the screen resolution you need. When you want to record a quick screencast or share an application, set the image as your desktop image. After that, place the application on top of the image and scale it to fit. Then draw the recording window around the application.
I have all sorts of preset images that I can switch depending on the software I need to share.
Here’s an example of what I do:
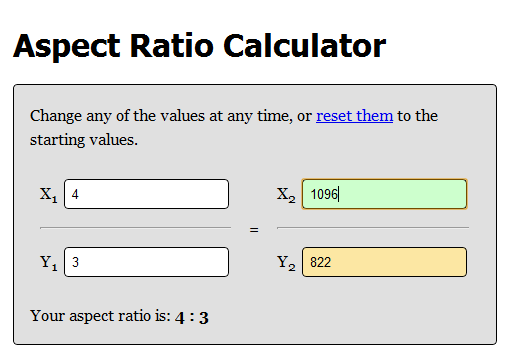
Let’s suppose I am recording some PowerPoint tutorials. I’ve played around with some settings and realize that I can get the best looking UI if the window is 1096 pixels wide. I also want the window to be 4:3 aspect ratio.
So I need to figure out what the proper dimensions are for a 4:3 aspect ratio that is 1096 pixels wide.
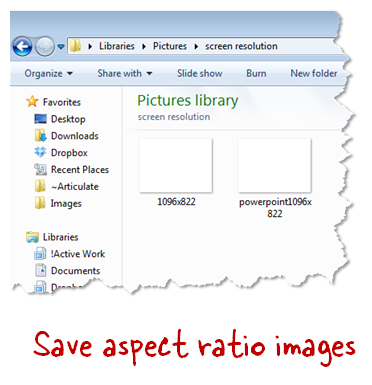
Calculate the 4:3 aspect ratio using the 1096 width. I use the aspect ratio calculator. A 4:3 aspect ratio starting with 1096 is going to be 1096×822.
Create a graphic that is 1096×822. I prefer a solid white graphic. You can make it a few pixels bigger if you like so there’s a margin when you record.
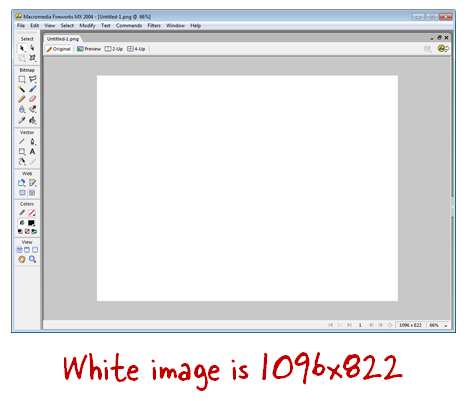
Save the image as 1096×822.png or powerpoint.png. I like to save by application name so it’s easier to locate.
Set the image as your desktop image when you’re ready to record. And then make sure it’s centered.

Place application over desktop image. Anytime you want to record an application, select its matching display image and then you can quickly align to the box. I find this really helps when I record with Screenr or when I do webinars.
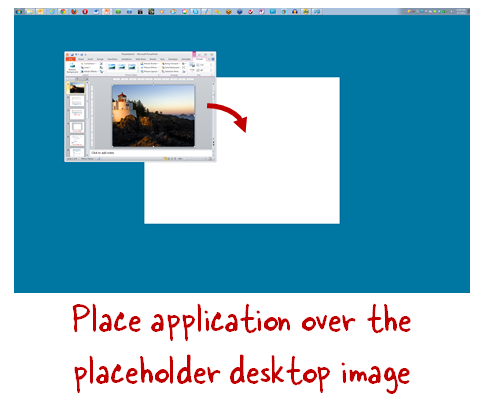
That’s basically it. You create an image of a certain size and then anytime you want to do a screencast, switch your desktop background to the image and center it. Place your application over the image and you’re all set.
I’m always switching between applications and screencasting products like Screenr and Storyline. So I find this works well for me.
Bonus Screencasting Tips
- Add a branded image. If you want to add a branded look for your Screenr (or screencast) videos, put your logo or tag line on the desktop image. Here’s a quick screencast I created to show what it looks like. I did a quick PowerPoint tutorial & added the community logo and link to the image. You could also do this for your webinar software demos. Here’s a tutorial that explains how to add the logo.
![]()
- Create an image that’s off to the side. This works great for webinars or screensharing where you can select an area of the desktop to show. Select the image area and then slide the applications in and out without having to worry about resizing the applications. Here’s a tutorial that explains how.

These tips should help if you want a simple way to quickly set up your desktop applications for sharing whether through a screencast or webinar.
Events
- Everyday. Check out the weekly training webinars to learn more about Rise, Storyline, and instructional design.
Free E-Learning Resources
 |
 |
 |
|
Want to learn more? Check out these articles and free resources in the community. |
Here’s a great job board for e-learning, instructional design, and training jobs |
Participate in the weekly e-learning challenges to sharpen your skills |
 |
 |
 |
|
Get your free PowerPoint templates and free graphics & stock images. |
Lots of cool e-learning examples to check out and find inspiration. |
Getting Started? This e-learning 101 series and the free e-books will help. |
You might also like:
25 responses to “Here’s a Simple Screencasting Tip That Will Save Time & Frustration”
Leggi la traduzione autorizzata in italiano del post qui:
[…] I have all sorts of preset images that I can switch depending on the software I need to share. Here’s an example of what I do: Create an image file that represents the screen resolution you need. Here’s a Simple Screencasting Tip That Will Save Time & Frustration » The Rapid eLearning Blo… […]
Or you could record at 1280×720 and post anywhere that accepts 720p video, like YouTube.
VERY nice job, Tom! Screencasting can be a bit problematic, but this is a nice toolkit to smooth out some of the bumps. Kudos, and thanks!
[…] Go here to see the original: Here’s a Simple Screencasting Tip That Will Save Time & Frustration » The Rapid eLearning Blo… […]
Cool tip Tom. Thanks. Just thought of a potential enhancement.
Put tips and reminders to yourself along the edges, outside the recording area, on your sizing wallpaper.
For example, “Speak With Enthusiasm!”
Smart ideas. Thanks for sharing.
I also like to use a freeware that I found called sizer that allows you to resize any window to an exact, predefined size. But I really like the idea of the logo at the bottom and/or notes off to the side!
@Johnn – Great suggestion. I recorded an example that uses a similar idea: http://www.screenr.com/3Sms
Another idea would be to use note cards as question cards with your screencasts: http://www.screenr.com/7p8
If you’re up to it, I’d like to see what you had in mind for the “reminders”.
Oh Tom, what brilliance in simplicity. Cursing myself that I had never thought of such an obvious and simple solution…. 🙂
Thank you. It´s great idea.
I like these ideas and I too use sizer but I am one of those people who makes training material on software that can’t be resized.
It’s a huge problem when using Articulate, which biggest fault (to me) is the lack of flexibility in creating custom size modules. Working within it’s video size restrictions is a nightmare and I have never understood why it only allows the one size powerpoint slide when even powerpoint has numerous sizes.
Tom you mention this problem briefly in your article, but I would love to hear people’s solutions. My only one is to have videos show in a new window – and we all know that’s not a desireable way to do eLearning.
BTW when I want software to all open the same size, I adjust it with sizer and close and then when I switch to it, it automatically opens to the last size it was made to. It even opens to the same spot that it was in when you last used it.
Great tip. Now I have a simple question – how did you create those nice looking shadowed “ripped edges”?
I ran into problems when doing this on Windows Vista. The new background image expanded to fill the entire screen.
If I did get this working, there would be another problem. My desktop screen is filled with icons. Some of them would overlay the tag line.
Am I missing something?
[…] Here’s a Simple Screencasting Tip That Will Save Time & Frustration » The Rapid eLearning Bl… […]
Thanks for the advice about hiding icons. So simple and so useful 🙂
It’s good to know your blog.
[…] Because of this, I am always figuring out just the perfect screen resolution for my software applications. Here’s a Simple Screencasting Tip That Will Save Time & Frustration » The Rapid eLearning Blo… […]
[…] Via http://www.articulate.com Share this:TwitterFacebookLike this:LikeBe the first to like this post. […]
[…] Here’s a Simple Screencasting Tip That Will Save Time & Frustration […]
[…] recording afterwards, you may end up changing the final display size of your recording. This is a handy tip about creating and maintaining optimum recording sizes – this seems especially helpful if you’re switching between several programs or windows […]


0
comments