


Leggi la traduzione autorizzata in italiano del post qui:
5 PowerPoint E-Learning Tips & A Free Template
April 17th, 2012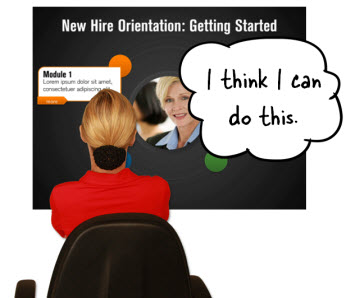
One of the topics we cover in the elearning workshops is how to quickly create templates to help move the elearning courses out of that PowerPoint look.
At a previous workshop someone wanted to see how this was done so we created one quickly in class. I like to do these templates because they help bring out a few ideas.
Ideas to Inspire Your Creativity
Most of us aren’t graphic designers and we struggle to come up with a nice looking design. One way to work around that is to be inspired by those who have graphic design skills.
As a habit, I like to review website designs for ideas. I learn a lot about layouts and how the designer is using color. I can apply these ideas to my elearning courses because when it comes down to it, a web pages and elearning screens are going to have the same visual elements like text, objects, colors, and pictures.
Develop Technical Proficiency
I’ve shared many templates and illustration ideas over the past few years. While the actual templates work for some of your projects, the main point is less about the actual output and more about developing technical proficiency with the tools you have. In this case, I mostly use PowerPoint.
With each template I try to reinforce some design ideas and techniques that you can use in PowerPoint to create your own templates or illustrations. If you can use the ones I give away, that’s cool. But hopefully you’ll take the time to practice some of the techniques so that you develop more proficient skills in PowerPoint.
Here’s a template we built in the workshop. The inspiration came from a template we quickly found on the template monster website.
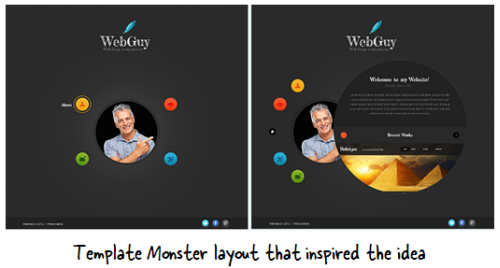
I liked the circular layout and the dark background. I also liked that the background is patterned because that lets me show a few extra design tips when using PowerPoint.
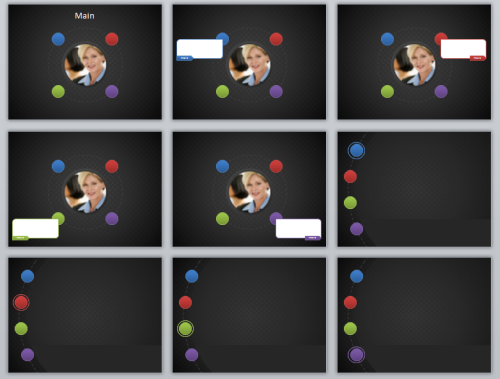
Above are the layouts we quickly developed in the workshop. As you can see, they look similar, but they’re not verbatim. I try to keep as much space open for content as I can so I didn’t use the larger circle layout from the template monster template.
PowerPoint Production Tips
Here’s an example of the template in action. If you want to use it, you can download it here.
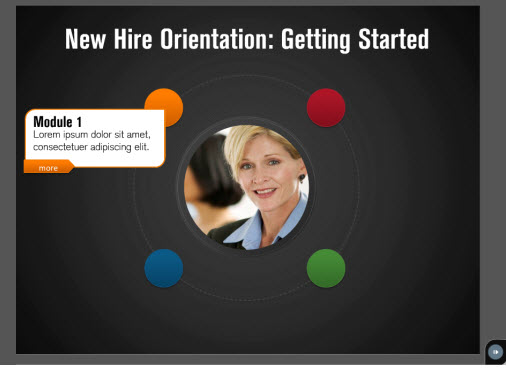
After previewing the template, check out the production tips below. They’ll help you save time the next time you build a rapid elearning course.
Create textured backgrounds by layering transparent images. Create shapes and fill them with gradients, colors, or patterns. Then vary their transparency. Sit them on top of each other and you can create all sorts of effects.
Use the selection pane to control layers and name objects. Starting with PowerPoint 2007 there’s a selection pane that allows you to see the layered objects. You can show/hide them for quick access.
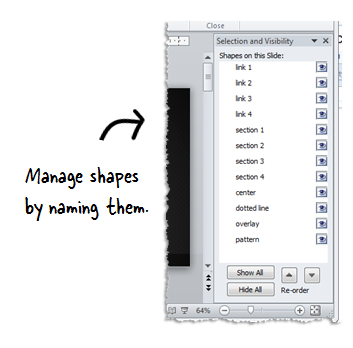
It’s a good habit to name them so that you can easily locate the objects. This is especially true if you leave the project for a while and come back in. Sometimes it’s hard to know what’s what. By naming the objects you’ll save time and get back up to speed quickly.
Add hyperlinks as objects and not on the object. If I use a hyperlink, I try to create a rectangle for the link rather than put the link on the object itself. The reason I do this is because I can identify the links on the slide.
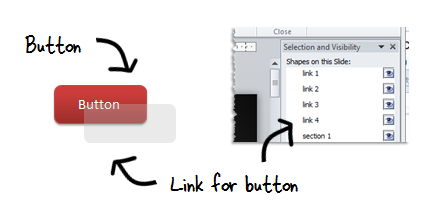
For example, if I put a link on a circle shape. How do I know the link is there without looking for it? But if I create a shape just for the link, then I know that there’s a link on the slide. Going to the point above, I also title the link in the selection pane so it’s easy to find.
In PowerPoint 2010, you can create custom shapes by combining shapes or using one to punch out a shape from the other.
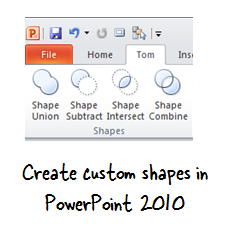
In the example from the template, I created a circle that extended way past the borders of the slide. So I used a rectangle and the shape subtract feature to cut off all of the shapes that were hanging over the slide edge.
Customize the ribbon for quick access to common PowerPoint features. Again starting in PowerPoint 2010 you can customize the ribbon toolbar to create your own shortcuts.
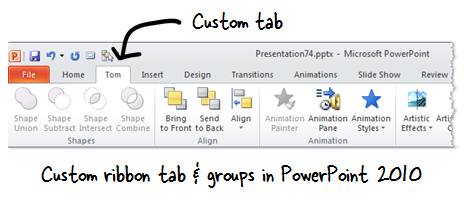
For example, the shape editing features that I mentioned above are not readily available. So you need to find them and add them to your toolbar. If you find that you use the same features quite a bit, create your own tab so that all of the common features are in one location. It probably is a good idea to create a “Rapid Elearning” tab with all of your favorite features.
There are a lot more PowerPoint tips and tricks that will help you build better elearning courses. Hope you enjoy the template. What’s your favorite PowerPoint tip? Feel free to share it by clicking on the comments link. Or better yet, create a quick Screenr so we always have access to your tip.
Events
- Everyday. Check out the weekly training webinars to learn more about Rise, Storyline, and instructional design.
Free E-Learning Resources
 |
 |
 |
|
Want to learn more? Check out these articles and free resources in the community. |
Here’s a great job board for e-learning, instructional design, and training jobs |
Participate in the weekly e-learning challenges to sharpen your skills |
 |
 |
 |
|
Get your free PowerPoint templates and free graphics & stock images. |
Lots of cool e-learning examples to check out and find inspiration. |
Getting Started? This e-learning 101 series and the free e-books will help. |
You might also like:
21 responses to “5 PowerPoint E-Learning Tips & A Free Template”
[…] See the original post here: 5 PowerPoint E-Learning Tips & A Free Template » The Rapid eLearning Blog […]
Great post! I was looking for some inspiration today, and your new template fills the bill…thanks so much. And thanks for all the tips, Tom. I always appreciate the screenrs demonstrating your ideas.
@Tom
I finally switched to 2010 PP last week. Your post could not be more timely!!
I discovered the new shape functionality last week and have already put them to good use. But, I didn’t know I could customise my own tab! Way too exciting for this post Easter bunny…
Thanks for yet another great template. Also, the link tip is again another one of your ‘so obvious why didn’t I think of it’ tips!!
Great stuff.
“Thanks Tom, another great tip. One of my favorite tips is “Little known ways to create your own graphics using powerpoint” “because the possibilities are seemingly endless and gives a lot of flexibility once you have found a good set of graphics that you can use over again.
Loving articulate. Have been using it for a short time (3 months)and would love to do some intensive training. Any chance of any workshops in Australia or being able to skype in or join a webinar somowhere else in the world??
Loving the templates.
[…] enjoy the template. What’s your favorite PowerPoint tip? Feel free to share it by clicking on the comments link. Or better yet, create a quick Screenr so we always have access to your […]
That’s a simple yet great way to carry forward the same theme throughout the course. Thanks.
This link was very helpful because the successful web design folks are pretty good at what they’d doing and worth watching.
In the process of following some of the related links I came across some postings about fonts. Not surprisingly, some are better than others. Some of those to avoid are due to overuse, other due to the perception you’re a dork if you use them. Anything in script is cited as a huge NO. Almost goes without saying.
Anyhow, here is a worthwhile link to with some free fonts.
And I keep going back to my favorite book: Design Elements: A Graphic Syle Manual to remind me what looks good.
Pete
Thanks for the great PPT tips, Tom! I have now created my own custom tabl…cool! I noticed that on your “Tom” tab you have a feature called “Pick up Object Style.” How do you use this feature? I’d love to see a Screenr video if that’s possible. I enjoy reading your blog each week. Thanks!
[…] 5 PowerPoint E-Learning Tips & A Free Template […]
[…] out the PowerPoint E-Learning Tips and Free Template from Tom at The Rapid eLearning […]
Thanks for Sharing this great way!!
thanks for the great tips! Keep up the good work!
Outstanding! I am starting a new course today and these are the tools I will use!!Fantastic! THANK YOU VERY MUCH!
[…] 5 PowerPoint E-Learning Tips & A Free Template One of the topics we cover in the elearning workshops is how to quickly create templates to help move the elearning courses out of that PowerPoint look. Les réseaux de zéro – Général Salut les zéros ! Vous êtes curieux ou passionné par les réseaux ? Vous êtes étudiant et avez du mal à appréhender et comprendre cet univers ? Vous êtes tombé au bon endroit ! Nous vous souhaitons la bienvenue dans ce tutoriel. […]
[…] Create a textured background: […]
[…] Create a textured background: […]
[…] blog post where I show how I use the selection pane when building an interactive template. It explains a bit more about naming the linked […]


0
comments