


Tom these are great, but which program are the made in? Studio 09 or Storyline. If Storyline, is there a way to do the samething in studio 09
Convert Your Bullet Points to Interactive E-Learning with Video
February 12th, 2013
Before elearning I did a lot of video production. Back then it was time intensive and costly. But in many ways that’s changed. Today you’re able to shoot decent video on your smart phones or inexpensive HD cameras. And then editing them is also relatively easy and inexpensive. In fact, most smart phones have access to video editing apps and there are plenty of free or low-cost video editors to use with your personal computers.
A few years ago you’d never consider adding video to a course because of the time and expense. But today adding video to an elearning course is easy especially if you keep the project relatively simple. You can create a decent elearning course that uses video in no time and at little cost.
The trick is finding ways to use video in your course and still maintain some form of rapid development. A great place to start is with your bullet points. Why not use video to make your bullet point information more interesting and engaging? In today’s post I’ll show one way to create interactive bullet points that when combined with the right type of video can make your elearning course more media rich and interactive while not adding too much to the production.
Example 1: Learn to Cook
Demonstrate the finer points of cooking. Watch the video and at any point where you want to learn more, click the information bullet.
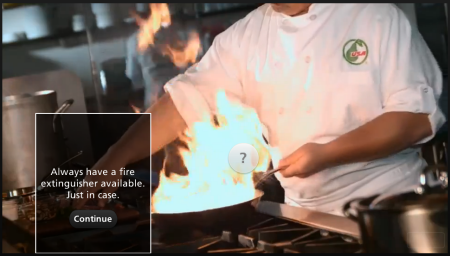
Click here to view the demo via Mike Enders
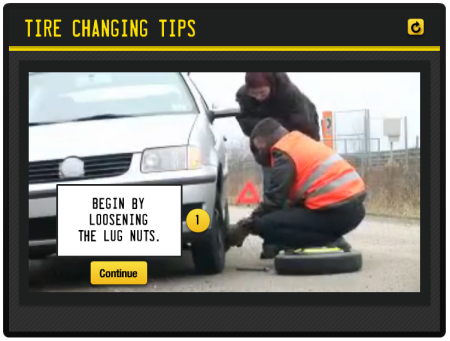
Example 2: Change a Tire with Your Friend
Follow a step-by-step process of how to change a tire. This particular video demonstrates how to deal with the non-helpful observer.
For this type of course to be effective, you need a topic that works with video. The most obvious is when you can show procedures like working on a machine or operating some equipment. It also works for role play scenarios. For example, record an interaction between a manager and co-worker. Then use the interactive buttons to point out key points during the interaction.
The key is to select a topic that is easy to record and that can be augmented with bullet point information. Here’s a quick demo I put together showing how to use the Keurig brewer.
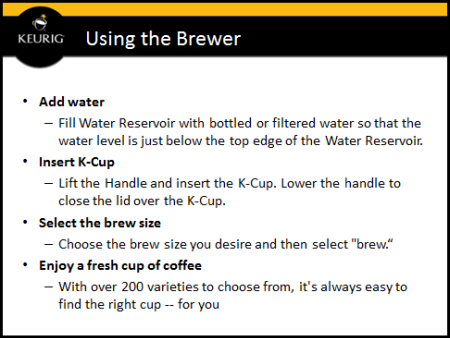
Example 3: Using the Keurig Brewer
Following is what the information about the brewer may have looked like in a standard elearning screen. It includes four steps and corresponding information.
And here’s the same information using a video and interactive bullet points. The video allows the learner to see what’s happening. And then interactive bullet points appear along the timeline to add additional information. If the learner wants to acquire more info, she can click the button. If not, she can ignore it and continue watching the video.
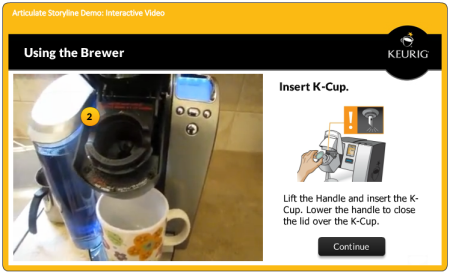
Click here to view the elearning demo.
Here’s what I like about this approach:
- Video is easy to shoot and relatively simple to edit with today’s tools. So it lets you make an elearning course that doesn’t look like every other course. Even if it’s a simple procedure like the demo above, it’s more interesting than a screen full of bullet points.
- Today’s elearning software offers more capability. A few years ago even a simple project like this wouldn’t have been possible for someone without programming skills. However, that’s changed. Today’s tools make this type of project possible. For example, I shot the video and compiled the course in Storyline in about 30 minutes.
- Flexibility for the learner. This is a great way to address different learning needs. Experienced people can watch the videos only and those with less experience can click on the interactive buttons to collect more information.
Of course this type of approach won’t work with every course and it’s not always feasible to shoot video and make interactive buttons. But if you want to use video in your elearning courses, this is a good place to start because it’s straightforward and simple to produce. Give it a try.
Added later:
Here’s a link to the same demo built in Quizmaker ’13 (would work the same in ’09). The only difference is you lose the interactive part, but you can leverage layering info on the video timeline.
Events
- Everyday. Check out the weekly training webinars to learn more about Rise, Storyline, and instructional design.
Free E-Learning Resources
 |
 |
 |
|
Want to learn more? Check out these articles and free resources in the community. |
Here’s a great job board for e-learning, instructional design, and training jobs |
Participate in the weekly e-learning challenges to sharpen your skills |
 |
 |
 |
|
Get your free PowerPoint templates and free graphics & stock images. |
Lots of cool e-learning examples to check out and find inspiration. |
Getting Started? This e-learning 101 series and the free e-books will help. |
You might also like:
19 responses to “Convert Your Bullet Points to Interactive E-Learning with Video”
Hi,
Love this type of video interaction – thank you – the one question I have is that this shows me how to use bullet points in a video, but it does not show me how to put them in the video. I am not familiar with Storyline yet. Can you point me to a place where I can see how it is done?
Nice! Loved the free plug you gave Costco’s new Kirkland Signature “Pacific Bold” K-Cups… 100 for $37.99 is a pretty good deal, huh? 😉
I am not very familiar with the functionality of Storyline, but could you explain how the video is pausing when the user clicks on the button?
Hello Tom. Just wondering if you can tell me how to set up a video with a START VIDEO button like in the Using the Keurig Brewer example. Is there a source file available for this so I can view how they set this up.
When I try to add a START VIDEO button all it does is enable the video to start but the timeline with the other elements is already playing. Many thanks.
Tom, very well put and demonstrated.
I believe videos will once again be BIG in eLearning, so this is quite useful. I wrote about it (if it interests you) here – http://www.upsidelearning.com/blog/index.php/2012/10/18/the-return-of-video-to-elearning/
With scenario type interactive videos becoming easier to create, this would literally explode.
At least I hope so 🙂
Cheers!
Leggi la traduzione autorizzata in italiano del post qui:
Excellent tips on interactive video, Tom. This makes a lot of sense when a client has a very technical topic….we have a project dealing with Power Plants….and instead of animating how a piece of machinery is working, we could just take a video and insert hotspots/bullets to explain the workings. Much quicker….and I believe much more effective educationally. I like it!
Thanks so much Tom for that link: http://www.screenr.com/BpD7
The critical information that helped me was the fact I can PAUSE TIMELINE OF BASE LAYER in the Intro Layer. Great stuff!
My company has had similar experiences with being able to incorporate more video as the cost of video production has gone down. There really is no reason not to take advantage of video in cases like these. It’s just so much more dynamic and memorable an experience for the learner.
Excellent points. I agree with you that it’s not possible to shoot video and make interactive buttons for every course.
I like how the interactive bullet points provide additional info for someone who needs it, but the video provides a visual representation of the actual steps. I imagine seeing it provides enough for a lot of people.


0
comments