


Storyline 360: Text Autofit Improvements
Article Last Updated
This article applies to:
Storyline 360 gives you more ways to manage text elements, finer control over text, and options for making text more accessible. And you can choose how Storyline 360 handles text that doesn’t fit its bounding box—let it overflow or add a scroll bar.
Accessing knowledge is key to every learner’s success. Text is a commonly-used element in e-learning courses to convey knowledge and explain concepts. It allows learners to comprehend topics, make connections, and develop insights. Text makes content perceivable to everyone, regardless of their abilities. Thus, text-based information must be readable and accessible to all learners. That's where text autofit improvements come in.
Curious? Check out the details below.
- Greater Control
- Overflow Handling
- More Precision
- Faster Workflow
- Improved Readability
- Compatibility
- Timeline of Autofit Changes
Greater Control
Previously, you could create text elements that didn’t wrap, allow text to overflow its bounding box, and shrink text to fit. Also, there wasn’t an intuitive way to create text elements at a fixed size without shrinking the text and making it difficult for learners to read.
Text autofit improvements give you complete control over text, such as preserving your preferred font size and preventing it from automatically shrinking. There are now three autofit options for managing text elements:
- Expand width. Select this option to turn off text wrapping and allow the text box’s width to expand to accommodate text.
- Expand height. Select this option to turn on text wrapping and allow the text box’s height to expand to accommodate text. (The width of the text box is fixed.)
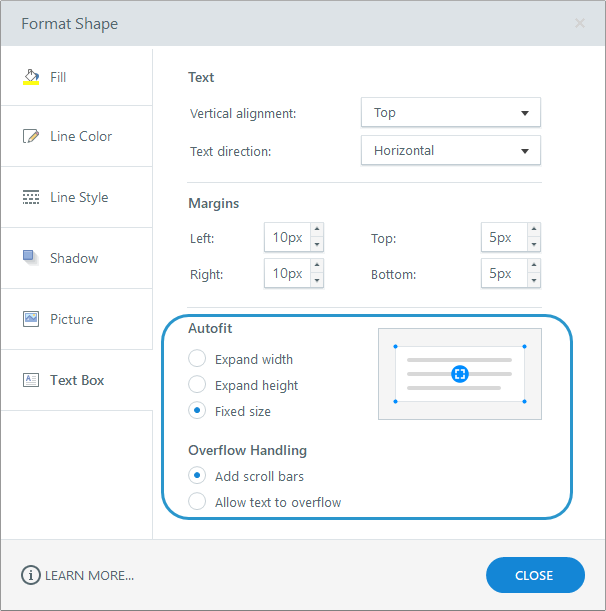
- Fixed size. Select this option to lock a text box at a fixed size. When locked, you can add a scroll bar to the text that doesn't fit or let it overflow, as shown below.
The autofit settings are mutually exclusive. You can toggle between the three options to see the different modes of fitting text, but you can only choose one.
Check out this before-and-after image to see the difference.
|
Before |
After |
 Legacy Shrink text on overflow setting |  New Fixed size setting with scroll bars enabled |
Overflow Handling
As of August 2021, you can choose how Storyline 360 handles text that doesn’t fit its bounding box—let it overflow or add a scroll bar.
Upgrading projects lets text overflow by default, preserving legacy autofit behavior. However, you can add scroll bars to individual fixed-size text objects at any time. Simply select the text object and choose the overflow option to Add scroll bars, as shown above.
We recommend enabling scroll bars to give all learners a better experience when they use accessible text.
More Precision
Previously, you couldn’t set exact dimensions for text boxes. Even if you clicked and dragged a text box to your preferred size, it would resize to the height of the first line of text as soon as you started typing. With text autofit improvements, you have precise control over the size of your text box.
Additionally, Storyline 360 handles text overflow better. That means text won’t overflow or shrink so you have control over how it fits within its box.
Another benefit is that you get a more accurate view of how text will look in the published output, giving you confidence that it displays as intended from the beginning.
Faster Workflow
It’s frustrating when simple edits take a lot of time. Text autofit improvements provide a smoother experience for handling text so you can accomplish more in less time.
Toggle any text element between the three autofit options with a single click. Just click the indicator at the bottom right of the box.

You can also change the text autofit settings for multiple ungrouped text elements at once. Just select the ones you want to update and right-click on any element, then select Format Shape and choose one of the autofit options.
Improved Readability
Accessible text is HTML text, and different browsers treat HTML text differently. As a result, there may be variations in line and character spacing across browsers even when learners don't change text properties. For example, some browsers add extra spacing, so learners may see unexpected scroll bars in some text elements, such as slide titles.
Text autofit improvements show you where those scroll bars might appear in the published output, so you can remove them before learners see them. Just expand the height of the text element or toggle to the Expand width autofit setting, as shown below.
Another way to help avoid scroll bars and provide more room for design is to use a bigger slide size. We recommend using the 960 pixels by 540 pixels slide size preset or larger.
Conversely, scroll bars can improve readability by preventing text from shrinking as it did previously. This is especially helpful for variable references that increase the text length and learners who use accessible text to increase the font size and line spacing.
Compatibility
Install the Storyline 3 April 2023 update to restore compatibility with Storyline 360. You can open, edit, and publish Storyline 360 project files that use text autofit improvements in Storyline 3. However, you can't upgrade text in Storyline 3 project files.
To learn more about compatibility, visit this article.
Timeline of Autofit Changes
Text autofit improvements have evolved over time based on customer feedback. View the timeline below for the full story.
May 2021
In the May 2021 update, we introduced text autofit improvements to Storyline 360. They were enabled by default for new projects, and existing projects could be upgraded.
June 2021
In the June 2021 update, we increased the default widescreen (16:9) slide size from 720 x 405 to 960 x 540—giving you more room to work and resulting in fewer unexpected scroll bars in text objects.
July 2021
While these enhancements are necessary to ensure all learners can access and read text, we heard from customers that the new autofit settings negatively impacted their authoring experience. Sometimes, unexpected scroll bars appeared due to text objects having extra lines, characters, or other elements that overflowed the bounds or margins of the shape. We realize that enabling text autofit enhancements by default resulted in extra work for authors.
Therefore, starting with the July 2021 update, text autofit improvements are disabled by default for new and existing projects (except projects that already have the enhanced settings).
You can upgrade projects at any time to use text autofit improvements and improve accessibility. Text autofit improvements can't be turned off once enabled. However, you can import slides into a new project file to revert to legacy autofit settings since text autofit improvements are disabled by default in new projects.
August 2021
When a project was upgraded, scroll bars appeared for text that didn’t fit its bounding box by default. This prevented text from shrinking, as it did previously, and supported learners who use accessible text to increase the font size and line spacing. Thanks to customer feedback, we learned that adding scroll bars by default resulted in more work for authors.
Starting with the August 2021 update, you can choose how Storyline 360 handles text that doesn’t fit its bounding box—let it overflow or add a scroll bar. Upgrading projects lets text overflow by default, and you can add scroll bars to individual fixed-size text objects at any time. Simply select the text object and choose the overflow option to Add scroll bars.