


Rise 360: How to Use Scenario Blocks
Article Last Updated
This article applies to:
Add more lean-forward moments to your Rise 360 courses with scenario blocks. Easily create branched scenarios with Content Library 360 characters. Just add dialogue, responses, and feedback to create your scenario.
Check out this excellent video tutorial, then read on to see how it works.
- Insert a Scenario Block
- Create Scenes
- Create Content and Add Branching
- End Your Scenario
- Preview Your Scenario
- Modify the Block Settings
- Accessibility Information
Step 1: Insert a Scenario Block
- Open a Rise 360 course, then edit an existing lesson or create a new one.
- Select All Blocks from the blocks shortcut bar. Or, click the insert block icon (+) that appears when you mouse over a boundary between blocks.
- From the sidebar, choose the Interactive category, then select Scenario.
Scenarios are made up of scenes that are, in turn, made up of content. Scenes can be sequential or offer a branching, nonsequential experience. Content can be formatted as informational text boxes or as dialogues.

Step 2: Create Scenes
In the scenario setup, you add scenes as well as choose your characters and backgrounds.
- Hover over the block to access the left-hand design toolbar. Click the Content icon.
- Select the scene you want to modify and change the scene’s title in the main window if desired. This is for your own organization and will not be visible in the published scenario.
- To change the background or character, click Edit Background or Edit Character in the main window.
When selecting a background, you can upload your own image or select an image from Content Library 360. When choosing an image from the library, you can filter by category. You’ll see several backgrounds that work great with scenario blocks.
Tip: When uploading or choosing an image, we recommend using “landscape” rather than “portrait” images. Since only a portion of the chosen image will display, you’ll want to try out several to find one that’s just right for your scenario.
When selecting a character, you can filter by clothing, gender, or age. Please note that only photographic characters are included in scenario blocks. You can have different characters for every scene but can’t change to a different character on individual pieces of content.
The choices you make are reflected in the thumbnail for each scene in the sidebar. Hover over the thumbnail to make it larger.
- To add more scenes to your scenario, click Add Scene at the top of the sidebar. This adds a new scene under the currently selected scene that uses the same background and character. You can also click the thumbnail for an individual scene and select Duplicate from the drop-down menu that appears.
- Collapse a scene by clicking the triangle next to the title to easily see the structure of your scenario. Click the triangle again to expand the scene.
- Drag scenes up and down to reorder the list. They’re renumbered automatically.
- To delete a scene, click the thumbnail for an individual scene and select Delete from the drop-down menu. Click Remove to confirm that you want to delete the scene and all of its content.
Step 3: Create Content and Add Branching
Scenes are made up of content. You can create back-and-forth dialogues or present informative text without dialogue. Both dialogue and text content provide multiple paths learners can take through the scenario.
Creating and Managing Content
- To create new content, click Add Content at the bottom of the sidebar. The new content appears under the currently selected content or at the top of the content list if you have a scene selected. You can also duplicate content by hovering over it in the sidebar, clicking the ••• icon that appears, and selecting Duplicate.
- To edit content, select it in the sidebar. In the title bar, use the right-hand drop-down menu to change the content type. Responses and feedback are preserved when you convert dialogue content to text content.
Dialogue offers a back-and-forth interactive scenario with multiple options to continue. See below for details.
Text provides informative content without interactive responses and one option to continue. See below for details. - For each, enter a statement or question. Enter responses and feedback for dialogue. Select character poses. Then choose your branching options.
- Drag content up and down the sidebar to reorder the list. You can't drag content to a different scene.
- To delete content, hover over it in the sidebar, click the ••• icon that appears, and click Delete.
Dialogue content uses responses and feedback to simulate a conversation with the learner. The chosen character presents the learner with multiple choices to continue. Progress is controlled by the learner’s responses.

- Enter a statement or question up to 200 characters and select a character pose.
- Type a response up to 150 characters and press Enter. Each dialogue can have up to three responses, each with its own character pose.
- Enter feedback for the response—up to 200 characters. This will appear as dialogue text coming from the character. Feedback isn’t required, but we recommend it!
- Use the Go to menu to determine what the learner sees when they choose a response. By default, a continue button will appear connecting to the next piece of content in the scene (if there is content following).
However, you can create a branching scenario by linking a response to a different piece of content or scene. Other options include ending the scenario or letting learners try again. You can also add new content from the menu to be the target for the response.
- Reorder the list by hovering over a response and grabbing the handle that appears on the left. Responses are renumbered automatically when you drag a response up or down. Branched responses aren’t affected.
- To delete a response, hover over it in the main window and click the trash icon that appears.
Text content presents learners with a single statement and is great for introducing or ending scenarios.

- Enter a statement or question up to 200 characters and select a character pose. You can also hide the character to center the text box in the scene.
- Use the Go to menu to specify where you’d like the learner to go next. By default, it’s the next piece of content, but you can create a branching scenario by linking to a different piece of content or scene. Additionally, content can end the scenario. You can also add new content from the menu to be the target for the response.
Step 4: End Your Scenario
You can end a scenario from a dialogue response or text content. Select End Scenario from the Go to menu.

Here’s what happens when you use the End Scenario branching option on dialogue content and text content. Be sure to check out the design tip for ending scenarios below.
Dialogue Content
When the learner clicks Continue after responding to a dialogue choice that ends the scenario, built-in text content displays, as shown below. You can modify the text for this screen by editing your text labels.

Text Content
When the learner clicks Continue and arrives at text content you’ve created to end the scenario, they’ll see your custom content (instead of the default text labels) and the Start Over prompt.
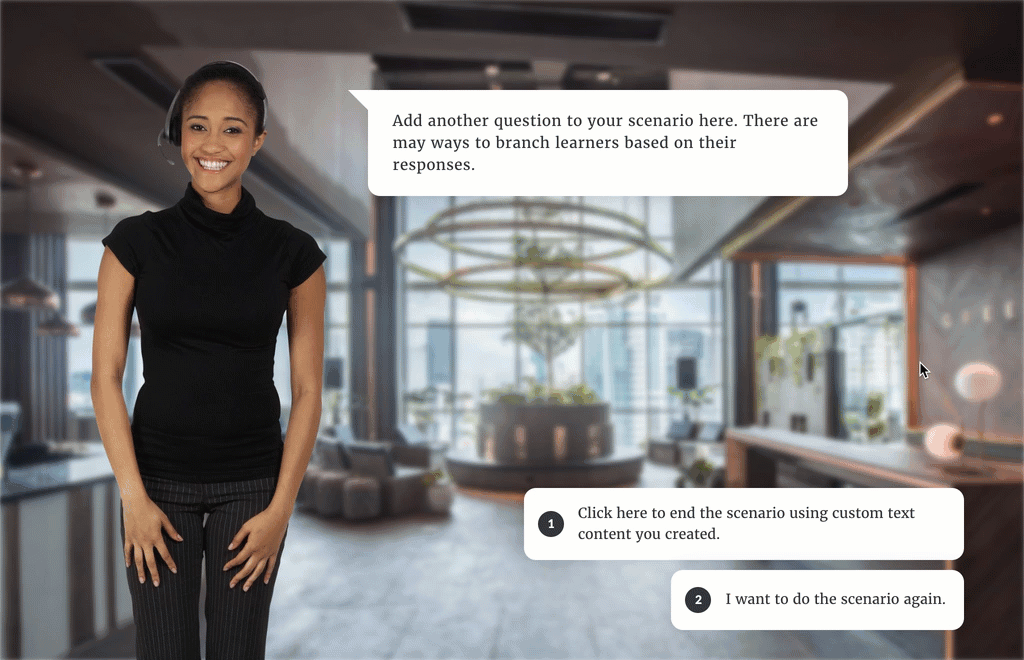
Design Tip for Ending Scenarios
Here's a great way to wrap up a scenario. Add a text content item to your scenario and customize it to represent the end of your scenario. Set its branching option to End Scenario.
Then make the last step in all the branches of your scenario go directly to the custom text content you designed rather than the built-in End Scenario option.
Step 5: Preview Your Scenario
If you want to test your scenario while you’re editing, it’s easy!
- While in scenario setup, click Preview in the upper right corner.
- Select Preview from beginning or Preview from current.
- The scenario preview will let you interact with your content in desktop mode. To view your scenario in other display ratios, exit scenario setup and preview the entire lesson.
- Click the close icon in the upper right corner of the preview to exit.
- Click the Close button in the upper right corner to return to your block lesson when you’re finished.
Tips and Tricks
- Adding a continue block after your scenario block requires learners to reach the conclusion of the scenario (no matter what path they took).
- Getting your scenes and content just right takes time and effort. Quickly reuse your scenario by turning it into a block template.
- Outlining is key when creating branching scenarios! Create a map with the note-taking tool of your choice to clearly see how your scenes and content connect. Then, when you make changes or adjustments, you’ll be confident you’re not breaking branches.
Step 6: Modify the Block Settings
Modify how your content looks on the screen by hovering over an existing block to access the left-hand design toolbar. Click the Style icon to access block background options. The Format menu provides options for changing the block padding.
Accessibility Information
Scenario Blocks are currently inaccessible. We recommend not using them when creating accessible content. If you do use this block, include a preceding text block that contains instructions, sets expectations, describes the background image, and provides a character description. Additionally, conduct testing with keyboard navigation and screen readers, focusing specifically on the text and dialogue content within the scenario.
Looking for more accessibility design tips or resources? Check out the following: