


Hey, Tom… that’s a great tip about layering texture & color of a shape. I’d never thought of that. 🙂
How to Use Free Textures to Build Better Online Courses
December 17th, 2013
Do a search and you’ll find all sorts of free textures to use with your online training courses. In a recent post I also shared how to get hundreds of free textures. The trick is learning to use those free resources so they make sense. And that’s what we’ll look at today—how to use the free textures to build better courses.
Use the Free Texture as a Background
The slide background is the single largest graphic in your course. The background image can turn what is a bland screen into something that is visually rich and interesting. It also adds some context and allows you to create a visual connection to the elearning course content. This is something I covered in the blog post on doing a background check your next elearning course.
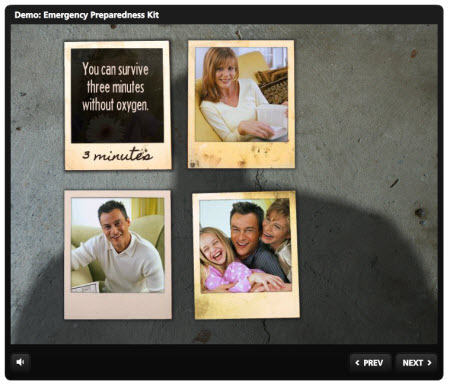
Sometimes you can find one image that is perfect. If so, that will save a lot of time in your production. In the case of a single texture, there may be one that works for your course context. For example, a few months back I built a demo for the blog post on different ways to state course objectives. In that one, I used a concrete texture for the background because it fit well with the earthquake theme especially since the concrete was cracked.
Play around with the textures to get unique looks. For example, an easy solution is to add a blur effect to the texture which detracts from the background and allows you to draw the person’s focus to specific objects on the screen. Thus when you add content on top of the texture, you get an image that is visually rich but not distracting.
Fill Shapes with Free Textures
Another way to get more value out of the free textures is to fill shapes with them. Usually when adding shapes to the screens we tend to stick with the defaults which are fill colors or gradients. What happens is that all of our courses have the same look.
Why not fill the shapes with textures rather than colors? That really opens the doors to all sorts of options. For example, you can scale the texture or tile it. When you compress the shape, the texture compress as well and that can create a distinct look.
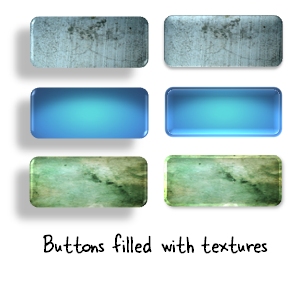
Working from the same idea, I’ll use a color picker to pick a color from the texture and use that as a background. Then I’ll add buttons to screen and fill the buttons with the texture, or vice versa.
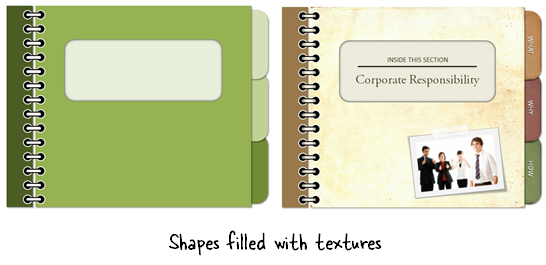
Here’s a simple example from a previous blog post, where elearning super hero Stephanie Harnett took a simple notebook template that I shared in a blog post and added textures to give it a richer look. As you can see, filling the shapes with textures transforms the default look into something that looks more custom and polished.
Click here to view the tutorial.
Customize Clip Art with the Free Textures
Another way to use the free textures is by customizing clip art. I’ve shared plenty of tips in the past on how to ungroup clip art and make custom modifications. One option is to either fill the clip art shape with a texture or use the layering effect I shared above.
In the image below you can see a simple example of a modified clip art image. In that image I softened the walls with a texture. The desk is made of layered wood. I added a linen layer to his suit and the chair padding is filled with a cloth texture.

If you’re stuck working with clip art, these types of modifications can help turn them into something unique.
Layer Textures Over Shapes
Sometimes the textures are too bold or strong. Or they may not fit with the colors of your shapes. In those cases you can layer the texture over an existing shape.
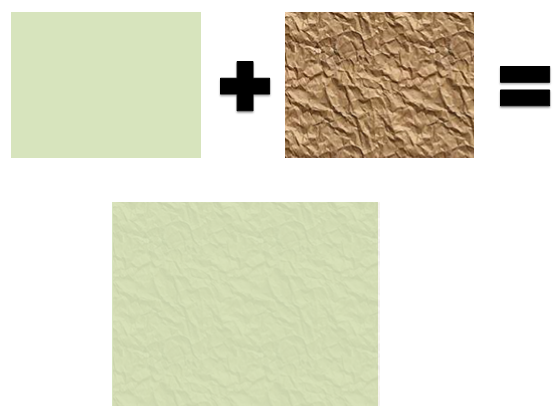
Here’s how:
- Create the shape and fill it with a color.
- Duplicate the shape and fill it with the texture.
- Place the textured shape over the colored shape. Then change the transparency of the textured shape to let the colored shape peek through.
- Group the shapes so they’re a single object. Or save the grouped shape as an image.
This technique is a great way to create custom images and soften up the texture.
There are plenty of free textures to find online. The key is figuring out how to use them when building your online training programs. Hopefully these tips will help you get more value out of the free textures you find. Do you have any tips to add?
Events
- Everyday. Check out the weekly training webinars to learn more about Rise, Storyline, and instructional design.
Free E-Learning Resources
 |
 |
 |
|
Want to learn more? Check out these articles and free resources in the community. |
Here’s a great job board for e-learning, instructional design, and training jobs |
Participate in the weekly e-learning challenges to sharpen your skills |
 |
 |
 |
|
Get your free PowerPoint templates and free graphics & stock images. |
Lots of cool e-learning examples to check out and find inspiration. |
Getting Started? This e-learning 101 series and the free e-books will help. |
You might also like:
3 responses to “How to Use Free Textures to Build Better Online Courses”
I’m with Heather – the laying the texture over colour technique, brilliant! Can’t tell you how many times I could have used this in the past!
Once again, well done. Theses graphics tips go a long way to improve PowerPoint as well. Which I recently posted about at http://www.idworkshops.com


0
comments