


One comment that I must add.
I’ve had trouble when using wmf artwork from Office dot com. It would apply to any wmf file types. Articulate doesn’t even recognize some of it and will recolor some objects back to their original condition. Even though the slide works perfectly in PPT does not mean it wil work in Articulate.
Now I convert it all to png and it has eliminated the mash-up.
Here’s How to Create Your Own E-Learning Template in PowerPoint
August 20th, 2013
Recently I shared some free PowerPoint templates to use for online learning and got a few questions about how I created one of them. So today I’ll share how I created the free template and some of the general considerations when designing your own templates and visual course design.
PowerPoint Enables Building E-Learning Templates
As many of you know I do a lot of my graphics work in PowerPoint because it’s a very capable tool. The free elearning template that I shared in a recent post is a good example of what you can in PowerPoint when it comes to building your own templates or doing any custom graphics work.

In this post I’ll walk through a few key productions techniques. Even if you don’t care about this template or building your own templates, the techniques can be applied to all sorts of custom graphics production using PowerPoint.
You Have Access to Free Stock Images
Initially I wanted to create an office themed template. So I downloaded the folder image below. The image was provided by Microsoft. Many of the pay stock image sites like istockphotos and Fotolio make images available through this site. They’re the smaller, low res versions. But that’s usually all you need. This is important to remember (especially if you have limited resources).
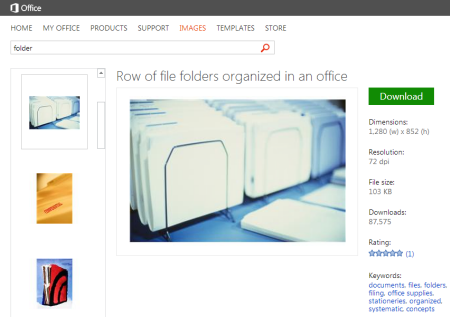
- Key point: You have access to all sorts of top quality images via the Microsoft site and clip art downloads. You just need to know what you need and then start searching.
Edit Your E-Learning Graphics in PowerPoint
The folder image is my background. So I intended to add a slight blur to it. The blur allows the image to set some context but not draw the focus from the content box that would be on top.
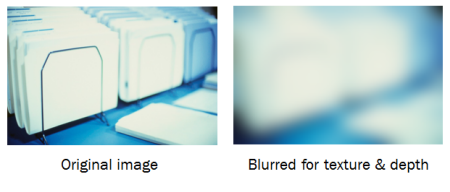
Once I started messing around with the image I realized I wanted the texture of the blurred image, but not really make the folder evident. So I decided to add a more prominent blur. This gives the background some depth and texture without adding too much noise.
Starting with PowerPoint 2010, there are all sorts of artistic effects that can be applied to your images and blurring is one of them.
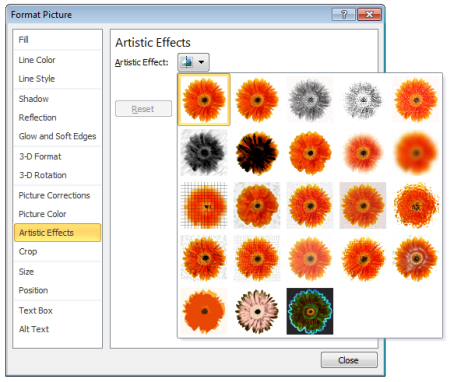
- Key point: PowerPoint offers a number of basic image editing capabilities. Take advantage of the opportunities to modify the images in PowerPoint. That could mean applying effects, cropping, or recoloring.
Create Custom Stock Images
Often we focus too heavily on written content and lose sight of the personality of the course. So I wanted to add a person to the screen to add some personality and to lighten the screen visually.

One of my favorite features in PowerPoint 2010 is that I can remove backgrounds. What I like to do is find images with people in them and then remove them so that I have an isolated person. The image above could easily become four isolated people images.
In the example from the free template it was really easy because the image I selected had a solid white background.

- Key point: Find people in images and then remove them from the image by isolating them. That gives you a lot more options when looking for free stock images and people to use in your online training courses.
Match the Color of Your Course Template to Your Stock Image
I needed a box to hold my objectives content so I added a box to the image. This served as my content placeholder. That’s easy enough to do. Just add a shape.

To get the right colors I did a color pick from the background image. To do that I used Pixie which is a free application that makes color picking real easy. I believe PowerPoint 2013 has a color picker and if you use Articulate Storyline you’ll also find a color picker in the color format properties. If not, use a tool like Pixie.
- Key point: Use colors from your background images to create a color palette. Pixie is a great tool, but you can do something similar with some of the other free color scheming tools.
Create Your Own Graphics
I created the arrow circles by combining shapes and then right-clicked to save the arrow as an image. Then I brought it back in as an image rather than shapes.
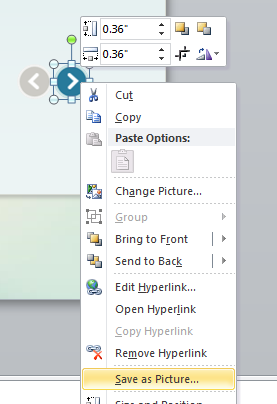
The reason I like to save as image is that I can then apply the image formatting to the graphics. In the case of the arrow, I recolored it as an end cap at the beginning and end of the interaction.
- Key point: Create your graphics in PowerPoint and save them as images. I use .png format. This way you always have access to the images outside of the online training course and you can leverage the image formatting features in PowerPoint.
Control Eye Movement with Shadows
One thing I learned in a design class years ago was how to control eye movement using light and dark areas. In this example I can draw the focus away from the edge to the center of the screen.

To do this, I added a darker space that serves as a visual dead end. This was easy to do. I
created a rectangle shape and used a gradient fill.
One part of the fill used a darker color pick from the image. And the other part was transparent so it blended with the background.
- Key point: There are a lot of things you can do to layer objects on the screen to create specific visual effects.
Additional bonus tips:
- Use the selection pane in PowerPoint to manage your layered objects.
- Put all of your persistent graphics on the master slide.
- Don’t be afraid to experiment.
Hopefully the free templates provide value and help with your elearning projects. But my greater hope is that by learning these tips and tricks you’ll be able to create your own graphics and templates to enhance your online training programs.
Events
- Everyday. Check out the weekly training webinars to learn more about Rise, Storyline, and instructional design.
Free E-Learning Resources
 |
 |
 |
|
Want to learn more? Check out these articles and free resources in the community. |
Here’s a great job board for e-learning, instructional design, and training jobs |
Participate in the weekly e-learning challenges to sharpen your skills |
 |
 |
 |
|
Get your free PowerPoint templates and free graphics & stock images. |
Lots of cool e-learning examples to check out and find inspiration. |
Getting Started? This e-learning 101 series and the free e-books will help. |
6 responses to “Here’s How to Create Your Own E-Learning Template in PowerPoint”
Thanks for the nice weblog. It was very helpful for me. Retain sharing this kind of ideas in the future as well. This was actually things i was looking for, and I am glad to be able to came right here! Thanks for revealing the similarly info with us
Thanks, Tom, especially intrigued by how the play of dark and light can control eye-movement. I’ll play around with that. Thanks again. –Daniel
Thanks a lot for sharing this! 🙂
i have been using power point for the past 1 year but its surprising that i dint know these things!!
This will make my work easy and i will be more comfortable using this tool.
I savor, cause I found just what I used tto be looking for.
You’ve ended my 4 day lengthy hunt! God Bless you man.
Have a nice day. Bye


0
comments