


Great explanation. I did something similar last week with an iPhone because I wanted to visually show how a 12 Lead ECG can be wirelessly transmitted from the ambulance to an iPhone.
Here’s a Free PowerPoint Template & Laptop Illustration
September 6th, 2011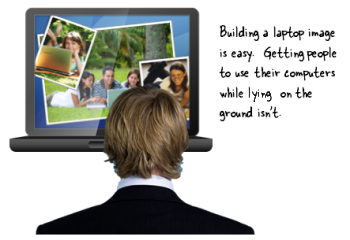
My guess is that some of the most common screen elements in elearning courses are computer monitors. They’re nice to use because contextually they fit elearning. And they’re great for holding the images and multimedia we use.
There are all sorts of computer monitors available through the office online site. But sometimes it’s just easier to build what you need. Plus, it’s a great way to learn more of PowerPoint’s illustration features.
In today’s post, I’ll show you how to build a laptop monitor inspired by the free laptop image file you can get from the psdGraphics site. It’s pretty simple and is made up of a rounded rectangles and essentially the same gray gradient.
Below is the tutorial. And at the end of the post you’ll find the original PowerPoint file for you to download and deconstruct.

Click here to view the tutorial via Screenr.
Here are some simple steps to create the laptop:
- Start with a rounded rectangle to create the top of the laptop. Then fill it with a gray gradient that runs from the top left-corner to the bottom right-corner. Add a thick line to the outside and use the same gradient, but make the light gray on top just a bit lighter.
- Duplicate the rounded rectangle shape and scale it down a bit. Center it and then fill it with your wallpaper image. I also like to add an inset shadow to create some separation.
- The bottom keyboard shape is a rounded rectangle with the top squared off. Use the format painter to fill the shape with the same gray gradient as the top and change the angle of the gradient to straight down so the dark is on the bottom.
- Create a small pill-shaped rounded rectangle and use the format painter to fill it with the same as the keyboard section. Then turn the shape upside down to create that indented look.
- Add a trapezoid shape to connect the top and bottom of the laptop. Fill it with the dark gray and then send to the back.
- To create the light effect, use a shape filled with semi-transparent white. Then right click and edit the points to the angle you want. If you find it a challenge to create the light effect, just skip it.
Bonus tip:
- If you want to add pictures or videos over the laptop image, then it’s probably a good idea to just fill the inside with black and square off the corners since the videos won’t have rounded corners.
- I combined shapes in PowerPoint 2010 to cut a hole in the lid and make it transparent. I saved it as a PNG. The inside is transparent and lets me put anything under the laptop image.
Here’s a quick mockup of how you could use the laptop image in an elearning course. I also added the tutorial to the last slide for those who can’t access the Screenr tutorial.

As you can see, building your own illustrations in PowerPoint isn’t that difficult. It’s just a matter of doing a few and soon you’ll develop a knack for building your own. At a minimum, these types of tutorials are good for you to practice your PowerPoint skills.
Of course if you don’t want to build the laptop image yourself, feel free to download the PowerPoint file or the laptop images I created from the Elearning Heroes community:
- Original PowerPoint file: feel free to deconstruct and see how it was built
- 3 laptop images: rounded corner, squared corner, and transparent background
Here’s an illustrator tutorial that shows how to build a different type of laptop. Do you want to try building it in PowerPoint? If so, let us know how it comes out.
Events
- Everyday. Check out the weekly training webinars to learn more about Rise, Storyline, and instructional design.
Free E-Learning Resources
 |
 |
 |
|
Want to learn more? Check out these articles and free resources in the community. |
Here’s a great job board for e-learning, instructional design, and training jobs |
Participate in the weekly e-learning challenges to sharpen your skills |
 |
 |
 |
|
Get your free PowerPoint templates and free graphics & stock images. |
Lots of cool e-learning examples to check out and find inspiration. |
Getting Started? This e-learning 101 series and the free e-books will help. |
18 responses to “Here’s a Free PowerPoint Template & Laptop Illustration”
[…] More: Here’s a Free PowerPoint Template & Laptop Illustration » The Rapid eLearning Blog […]
Great tutorial Tom! And you’re so right…sometimes the amount of time searching for that just right graphic takes longer than just building one yourself to fit the need.
[…] of the post you’ll find the original PowerPoint file for you to download and deconstruct…Show original Share this:TwitterFacebookLike this:LikeBe the first to like this post. Categories […]
It seems easy, but it takes me almost an hour and I have to watch your tutorial. I am not a good student:)
Thank you very much for the lesson.
Regards,
Tri Hue
Hey Tom,
Tried doing it in PPT 2007. It worked but my issue is the gradient fill since I don’t have slider like the one you have for PPT 2010.
But then again, it helps! I really like your blog. Thanks for sharing this.
Hi Tom,
On your list of links at the end of this post, you mention your pre-conference workshop at Devlearn. Do you have an idea how much of that content overlaps with the existing Articulate Studio Pro open enrollment courses? I’m going to three of those 1-day courses (Basic + Advanced + RELD), and was considering tacking on your workshop before DevLearn as well, but didn’t want to hear the same stuff. Thanks…
Good post. Once you get some practice in you can produce some nice things that are even reusable. I have a “template” deck I keep with all of the graphics I create so I can find them again in the future.
Also creating your own avoids potentially nasty copyright issues.
Buck Bard
Can anyone help me with instructions re how to upload a zip file to Moodle 2.0 so that students can see it unzipped as a training resource?
Tom this tutorial is very very helpful and its easy for reading and understanding. Thank you very much for this article and I hope you will do again.
[…] Laptop […]
Great tutorial Tom! I’ve been creating shapes and objects in PowerPoint for years, and even more as of late! I can see a number of tools you’ve used here that I could use in other applications as well as when I need to create the image of a laptop better than ClipArt’s version! Thanks so much!
[…] Here’s a Free PowerPoint Template & Laptop Illustration » The Rapid eLearning Blog Here’s a list of upcoming conferences and presentations: 2012 is just around the corner. If you’re interested in having me present, now’s a good time to connect with me since my schedule fills quickly. […]
[…] Here’s a list of upcoming conferences and presentations: 2012 is just around the corner. If you’re interested in having me present, now’s a good time to connect with me since my schedule fills quickly. Tidbits: Here’s a Free PowerPoint Template & Laptop Illustration » The Rapid eLearning Blog […]


0
comments