The Rapid Elearning Blog

Archive for August, 2013


Articulate Rapid E-Learning Blog - how to manage emails for online training programs

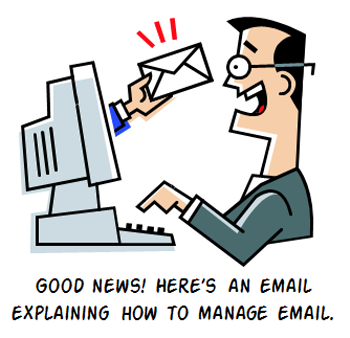
Email is a reality for many of us. Often it’s a pain to manage and odds are that managing your emails plays a large part in managing your online training programs.

During a recent elearning workshop, someone brought up emails and asked how I managed mine. As can be expected I get quite a few between the blog and elearning community and sometimes it’s difficult to stay on top of them.

In an earlier post we looked at ways to communicate better with our subject matter experts when using email. Today I’ll share my strategy for managing my email inbox. Perhaps there’s something that will help you, too.

Create a Simple Way to Sort Emails

To me one of the biggest problems is that my inbox fills so rapidly that I lose track of what’s there and what I need to do. Years ago, when I got fewer emails I was able to use my inbox to manage my action items. But today that doesn’t work.

My goal is to limit how often I touch a particular email so I quickly review my inbox and then sort emails to their appropriate category.

This starts with four basic categories:

  • Read and delete. I review the email and determine if it needs any further action. If there’s no action required or need to archive the email, I delete it. There’s no reason to keep it around to clutter up my inbox and distract me when I come back in.
  • Forward to someone else. I get a lot of technical support questions. Fortunately I have four community managers who can help with these. So I divvy up those requests and forward to one of my community managers. This way the person who needs help isn’t waiting on me to respond. I also have some email responses set up with relevant links so that when I get technical questions I have quick access to the resources they need.
  • Move to “Answer this” folder. If I can’t quickly forward the email to someone else (or the email requires a more detailed response) I move it to my “Answer this” folder. I’ll get to it later during the time designated to answer emails.
  • Move to “Do this” folder. This is my highest priority folder. It contains emails related to projects or known deadlines. They are the things I need to do right away. So this is the first folder I go through to make sure that I am on top of things.

This simple sorting process has cut my time with emails significantly.

Set a Specific Time to Review Emails

I take about 30 minutes at the beginning of the day where I quickly sort new emails. I can do a quick review of what’s there and also stay abreast of any immediate concerns.

Articulate Rapid E-Learning Blog - example of a calendar schedule for managing email and the inbox

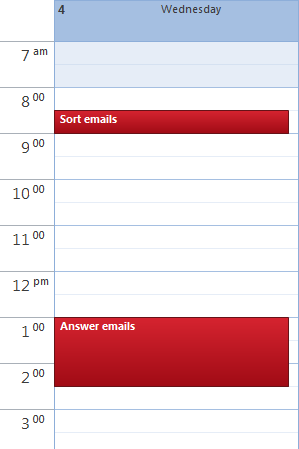
Later in the day, I set about 90 minutes or so (sometimes it takes a lot longer) to answer emails. I try to knock off the “to do” emails first, and then get to the “answer this” emails. This helps me stay on track with those things that have deadlines or due dates.

Before I set a specific time to answer emails I’d do it on the fly or in the time I had between meetings and projects. The problem was that I was less productive and there would always be things in the emails that pulled me away from more important tasks. Today I just let the emails sit until my designated time.
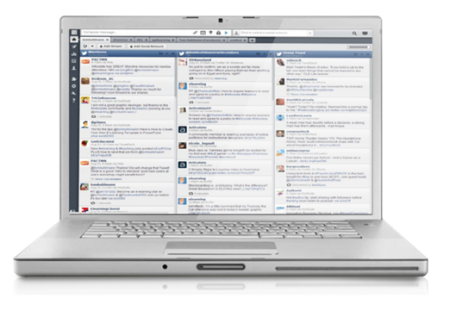
Turn off the Spigot

I get lots emails from blog readers and the community. I can control some of that by the channels I offer for self-service like the tutorials in the community and quick access to other resources.

I also get notifications from all sorts of social media sites and services like Twitter, Facebook, and LinkedIn. Most of that stuff is noise and will consume time; and even if they don’t consume a lot time, they are still the types of little distractions that can pull you out of the zone and not allow good concentration on completing tasks.

To counter this I turn off the notifications and visit the social media sites based on a schedule. Just like I have a set time for email and real projects, I have a set time to review social media alerts and other information. This has been a massive help to getting things done.

Articulate Rapid E-Learning Blog - hootsuite is a good tool to manage social media alerts

Here are some tools I use to manage my emails and other alerts:

  • Quick Steps in Outlook 2010 is your friend. I have a bunch of Quick Steps that let me filter and respond to emails in seconds. That is one of the biggest helps to me the past couple of years. I can also assign categories so it’s much easier to review the emails.
  • Find a social media tool. I’ve tried a few and settled on Hootsuite . It lets me manage my social media alerts and filters. For the most part it gives me a single point of contact for all of those sites. There are other good tools out there like TweetDeck. Find one and learn to use it.
  • Guide your time management. I have an iPad and use the 30/30 app. I set a specific time to work on a task and the app helps me stay focused. I’ve also been trying to get my kids to use it for their school work. I’ll let you know how that goes in a couple of years.

Articulate Rapid E-Learning Blog - good resources to help manage email and the inbox - hamster revolution and getting things done

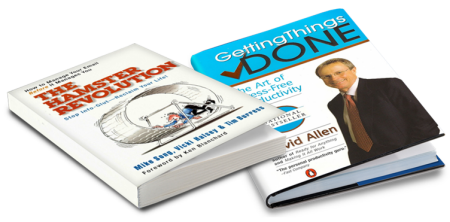
Over the years I’ve read some good books on time management that have helped. I like the Hamster Revolution and the stuff I’ve read on Getting Things Done. Personally I’ve found that the key is to develop a good simple strategy and then work at sticking with it.  And the strategy that works best for me is one that is intuitive and works without requiring a whole new personality. The links to Amazon books may produce a slight commission.

I’m no expert on email management and I’m sure there are hundreds of great resources available online. But the tips above have helped me thus far and perhaps they’ll help you, too especially when working on elearning projects.

What do you do to manage your emails? I’d love to know.

Events

Free E-Learning Resources

Want to learn more? Check out these articles and free resources in the community.

Here’s a great job board for e-learning, instructional design, and training jobs

Participate in the weekly e-learning challenges to sharpen your skills

Get your free PowerPoint templates and free graphics & stock images.

Lots of cool e-learning examples to check out and find inspiration.

Getting Started? This e-learning 101 series and the free e-books will help.


Articulate Rapid E-Learning Blog - how to create your own template for online training

Recently I shared some free PowerPoint templates to use for online learning and got a few questions about how I created one of them. So today I’ll share how I created the free template and some of the general considerations when designing your own templates and visual course design.

PowerPoint Enables Building E-Learning Templates

As many of you know I do a lot of my graphics work in PowerPoint because it’s a very capable tool. The free elearning template that I shared in a recent post is a good example of what you can in PowerPoint when it comes to building your own templates or doing any custom graphics work.

Articulate Rapid E-Learning Blog - example of a free PowerPoint elearning template

In this post I’ll walk through a few key productions techniques. Even if you don’t care about this template or building your own templates, the techniques can be applied to all sorts of custom graphics production using PowerPoint.

You Have Access to Free Stock Images

Initially I wanted to create an office themed template. So I downloaded the folder image below. The image was provided by Microsoft. Many of the pay stock image sites like istockphotos and Fotolio make images available through this site. They’re the smaller, low res versions. But that’s usually all you need. This is important to remember (especially if you have limited resources).

Articulate Rapid E-Learning Blog - how to find free stock images

  • Key point: You have access to all sorts of top quality images via the Microsoft site and clip art downloads. You just need to know what you need and then start searching.

Edit Your E-Learning Graphics in PowerPoint

The folder image is my background. So I intended to add a slight blur to it. The blur allows the image to set some context but not draw the focus from the content box that would be on top.

Articulate Rapid E-Learning Blog - example of a free stock image

Once I started messing around with the image I realized I wanted the texture of the blurred image, but not really make the folder evident. So I decided to add a more prominent blur. This gives the background some depth and texture without adding too much noise.

Starting with PowerPoint 2010, there are all sorts of artistic effects that can be applied to your images and blurring is one of them.

Articulate Rapid E-Learning Blog - use PowerPoint to do some simple image editing

  • Key point: PowerPoint offers a number of basic image editing capabilities. Take advantage of the opportunities to modify the images in PowerPoint. That could mean applying effects, cropping, or recoloring.

Create Custom Stock Images

Often we focus too heavily on written content and lose sight of the personality of the course. So I wanted to add a person to the screen to add some personality and to lighten the screen visually.

Articulate Rapid E-Learning Blog - example of how to remove the background of picture and photos

One of my favorite features in PowerPoint 2010 is that I can remove backgrounds. What I like to do is find images with people in them and then remove them so that I have an isolated person. The image above could easily become four isolated people images.

In the example from the free template it was really easy because the image I selected had a solid white background.

Articulate Rapid E-Learning Blog - example of background removed from picture using PowerPoint

  • Key point: Find people in images and then remove them from the image by isolating them. That gives you a lot more options when looking for free stock images and people to use in your online training courses.

Match the Color of Your Course Template to Your Stock Image

I needed a box to hold my objectives content so I added a box to the image. This served as my content placeholder. That’s easy enough to do. Just add a shape.

Articulate Rapid E-Learning Blog - use a color picker

To get the right colors I did a color pick from the background image. To do that I used Pixie which is a free application that makes color picking real easy. I believe PowerPoint 2013 has a color picker and if you use Articulate Storyline you’ll also find a color picker in the color format properties. If not, use a tool like Pixie.

  • Key point: Use colors from your background images to create a color palette. Pixie is a great tool, but you can do something similar with some of the other free color scheming tools.

Create Your Own Graphics

I created the arrow circles by combining shapes and then right-clicked to save the arrow as an image. Then I brought it back in as an image rather than shapes.

Articulate Rapid E-Learning Blog - save as image in PowerPoint

The reason I like to save as image is that I can then apply the image formatting to the graphics. In the case of the arrow, I recolored it as an end cap at the beginning and end of the interaction.

  • Key point: Create your graphics in PowerPoint and save them as images. I use .png format. This way you always have access to the images outside of the online training course and you can leverage the image formatting features in PowerPoint.

Control Eye Movement with Shadows

One thing I learned in a design class years ago was how to control eye movement using light and dark areas. In this example I can draw the focus away from the edge to the center of the screen.

Articulate Rapid E-Learning Blog - how to combine layers in PowerPoint to create custom stock images

To do this, I added a darker space that serves as a visual dead end. This was easy to do. I
created a rectangle shape and used a gradient fill.

One part of the fill used a darker color pick from the image. And the other part was transparent so it blended with the background.

  • Key point: There are a lot of things you can do to layer objects on the screen to create specific visual effects.

Additional bonus tips:

Hopefully the free templates provide value and help with your elearning projects. But my greater hope is that by learning these tips and tricks you’ll be able to create your own graphics and templates to enhance your online training programs.

Events

Free E-Learning Resources

Want to learn more? Check out these articles and free resources in the community.

Here’s a great job board for e-learning, instructional design, and training jobs

Participate in the weekly e-learning challenges to sharpen your skills

Get your free PowerPoint templates and free graphics & stock images.

Lots of cool e-learning examples to check out and find inspiration.

Getting Started? This e-learning 101 series and the free e-books will help.


Articulate Rapid E-Learning Blog - Compliance training proves no match for the Sharknado

One of the easiest things you can do to make your course look good is to find a great background. The background is the largest single graphic in your course and can set the tone for what you do.

Here are a few posts that will help you understand the importance of how the background image impacts your course design:

Articulate Rapid E-Learning Blog - free office theme graphics for online training

It’s good to be intentional about the background graphic that is used. But that doesn’t mean you need to be a professional graphics designer. In the image above, the essence of the course was “corporate office.”

To get the right look, David used a corkboard and some “office embellishments” like the folder tabs and labels. From there he had the option to place other content on the board. Pretty simple, huh?

Of course, sometimes you need a good starting point. So here’s a list of the free backgrounds available in the elearning community. You’re free to use them for your online training as you wish.

Free Blurred Background Graphics

Blurred backgrounds are great. They provide some texture and depth, but don’t conflict with the other visual content. In fact I used one of the blurred backgrounds in the demo I built below.

Articulate Rapid E-Learning Blog - example of an online training course that uses free graphics

Click here to view the elearning example.

Articulate Rapid E-Learning Blog - free background graphics that use a blur

Free Textured Background Images

Sometimes a solid colored background is fine. In fact, the flat look is pretty popular today. That is until some designer gets bored and then tells you how lame flat is.

Articulate Rapid E-Learning Blog - free textured backgrounds for online training programs

In either case, if you go with a solid color you may find the starting color looks too harsh. This is where softening the color makes sense. That is until some designer tells you softened colors are lame. If you don’t care what the designer says, here are three ways to soften the colors of your flat background design.

  • Add a colored shape to the screen and then modify its transparency so that the white background bleeds through a bit.
  • Use the three free background images from the community. They have a textured pattern that also softens the look.
  • Create your own color backgrounds and use the pattern template included with the download to soften the image. David does a great explaining how to do that in this tutorial.

Free Background Images that Add Depth to Your E-Learning Slides

In an earlier post I shared some tips on how to create slides for your online training courses that have some depth.  It’s the “wall, baseboard, and floor (WBF)” technique, or as one of the blog readers said, “Why be flat?”

Articulate Rapid E-Learning Blog - example of how to create your own free graphics

This is a simple way to change the most boring elearning course into one you’d print on a shirt and wear to the Mardi Gras. All joking aside, it is a great way to quickly change the look of the course and make it a bit more visually interesting. If you don’t have time to practice making your own, take advantage of the ones included below.

Articulate Rapid E-Learning Blog - some free backgrounds and templates for online training

5 Free Backgrounds to Use with Characters & Interactive Scenarios

With photographic characters it’s easy to get backgrounds because all you need is a photo. With vector characters it’s not that easy. That’s where these handy backgrounds really help.

Articulate Rapid E-Learning Blog - free backgrounds for interactive scenarios that use avatars or characters

You can go from confused characters to ones that are engaged and excited in just a few clicks. There are five office backgrounds to start.

Articulate Rapid E-Learning Blog - example of free backgrounds

Of course, you can use the “Why Be Flat” technique to create your own. And you’re not limited to the backgrounds listed above. All of those display graphics in the download section can also be used to help build your online training.

Articulate Rapid E-Learning Blog - more free backgrounds

In an ideal world, you have the graphics design resources to build a custom look for each course. But we know that’s not always possible. That’s where having the right background really comes in handy.

And if you’re just getting started or need something real quick, these backgrounds should help.

We’ll be adding some more soon, so be sure to bookmark the free downloads section so you can take advantage of all of the free assets for building your elearning courses.

Events

Free E-Learning Resources

Want to learn more? Check out these articles and free resources in the community.

Here’s a great job board for e-learning, instructional design, and training jobs

Participate in the weekly e-learning challenges to sharpen your skills

Get your free PowerPoint templates and free graphics & stock images.

Lots of cool e-learning examples to check out and find inspiration.

Getting Started? This e-learning 101 series and the free e-books will help.


Articulate Rapid E-Learning Blog - free PowerPoint templates

Who doesn’t like free elearning templates? I had a bunch of people email asking for the templates from last week’s post on how to create simple learning objectives screens.

Below you’ll find the two free PowerPoint templates from last week. And to sweeten the deal, I added an additional one based on a clip art image to show that even if that’s all you have, you can still use the images to create effective screens for your online training programs.

Free PowerPoint Template: Linear Objectives

Articulate Rapid E-Learning Blog - free PowerPoint template for online training courses

Download links:

Free PowerPoint Template: Circle Objectives

Articulate Rapid E-Learning Blog - free PowerPoint template for rapid elearning courses

Download links:

Free PowerPoint Template: Clip Art Circle Objectives

Articulate Rapid E-Learning Blog - free PowerPoint template based on a clip art image

Download links:

Let me know what you think of the templates and feel free to share a link if you use them for anything.

Events

Free E-Learning Resources

Want to learn more? Check out these articles and free resources in the community.

Here’s a great job board for e-learning, instructional design, and training jobs

Participate in the weekly e-learning challenges to sharpen your skills

Get your free PowerPoint templates and free graphics & stock images.

Lots of cool e-learning examples to check out and find inspiration.

Getting Started? This e-learning 101 series and the free e-books will help.