The Rapid Elearning Blog

Archive for October, 2012


Articulate Rapid E-Learning Blog - can you spare a feature in PowerPoint

A few years back, I was at a workshop where the PowerPoint team was showing some of the new features in the soon-to-be-released PowerPoint 2010. As they were talking about the features, one of them mentioned the ability to combine shapes to create your own.

I thought it was a pretty cool feature so I asked in what tab it was, and the reply was that it wasn’t in a tab.

Huh? Why create a cool feature and bury it where it can’t be found?

No need to fret, though. The PowerPoint developer demonstrated how to customize the ribbon toolbar in PowerPoint. And that’s a pretty powerful feature, especially for rapid elearning developers.

Why Would You Need to Customize the Ribbon?

Before we look at how to customize the ribbon, let’s explore why it makes sense.

There are a number of features I use quite a bit when it comes to building elearning courses. As it is now, I have to click on a number of tabs. For instance, I change the font from one tab, then go to another to crop an image, and then another to add an animation.

  • Add frequently used features to a single tab. Why not put some of the more common features in a single tab? It doesn’t matter if you can find them in other tabs. But it sure comes in handy if they’re all in a single tab.

Articulate Rapid E-Learning Blog - how to create a custom tab in PowerPoint

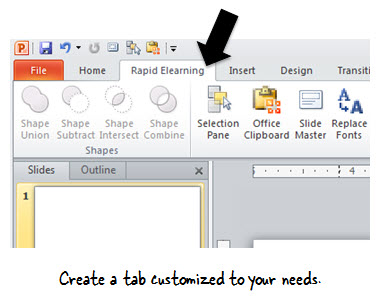
  • Add those oddball, hard to remember features to a tab. Creating custom shapes is buried in PowerPoint and not easy to find. It makes sense to add those features to a single tab. This way when you do need one, you’re not scratching your head trying to remember where it is.

Articulate Rapid E-Learning Blog - how to find hidden features in Powerpoint

It doesn’t really matter which features you add and why. The main thing is that you can! Select the features you like and then group them based on your needs. Having a custom tab will save you time and a bunch of extra clicking around.

How to Customize the Ribbon in PowerPoint 2010

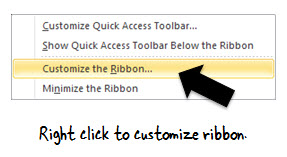
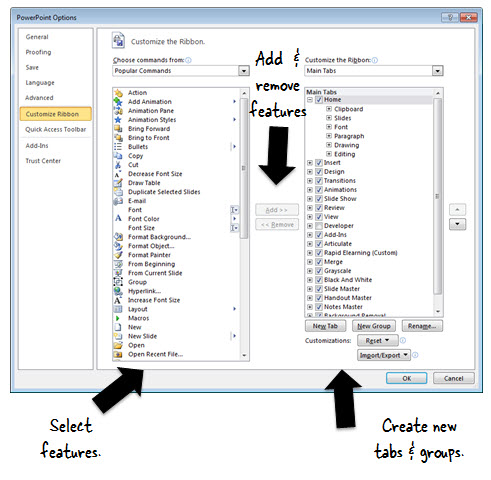
Customizing the ribbon in PowerPoint 2010 is really easy. Right click on the ribbon and select Customize the Ribbon.

Articulate Rapid E-Learning Blog - how to right click and customize the ribbon in PowerPoint

Then you’re able to select a range of features on the left side, and add them to the right side.

  • First create a custom tab.
  • Then create groups.
  • Add the features you want to the groups in your new tab.

Articulate Rapid E-Learning Blog - how to add features to the ribbon in PowerPoint

Finding Hidden Features

There are all sorts of features in PowerPoint. The most common are already featured in the ribbon. But there are some features that aren’t.

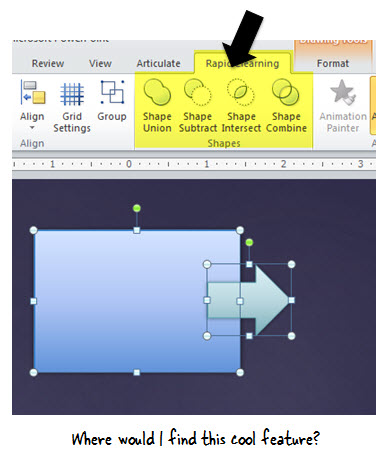
For example, the ability to combine shapes is a feature not in the ribbon by default. That means you’d have to add it to the ribbon. But where do you find the hidden features? Glad you asked.

Articulate Rapid E-Learning Blog - how to find features when customizing the ribbon in PowerPoint

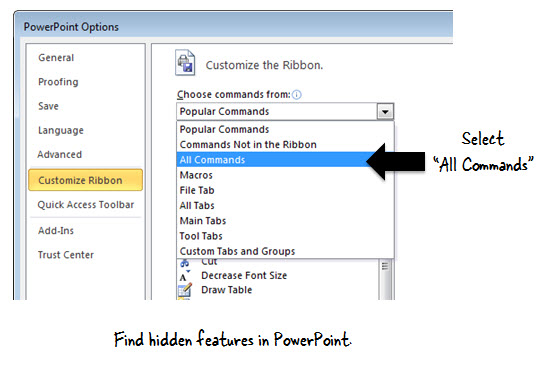
  • Select All Commands from the drop-down menu. That exposes all of the commands available to you.
  • Add the ones you want. If you’re not quite sure what a feature does, add it to the ribbon and do some tests. Or do a search online.

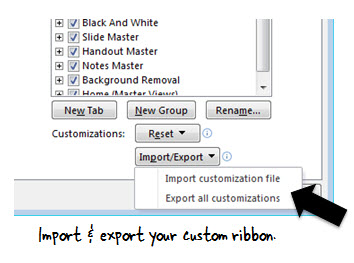
Once you have a custom ribbon, you can export the file and then import it to your other computers so that they all are the same.

Articulate Rapid E-Learning Blog - how to import and export your custom ribbon in PowerPoint

My Favorite Rapid E-Learning Features

There are all sorts of features that you could add to a custom ribbon. I look for the ones I use most often and like to have them available with the fewest clicks. I don’t really care if they’re in the other tabs.

Here are some of the features I like to have in a single tab:

  • Add a new slide/layout
  • Slide master
  • Insert pictures & clipart
  • Paste as PNG
  • Access clipart online
  • Insert shapes
  • Cropping
  • Edit points
  • Custom shapes: subtract, intersect, combine, and union
  • Arrange objects
  • Guides
  • Selection pane
  • Animation pane
  • Animation styles
  • Format painter
  • Pens (for hand-drawn markups)
  • Office clipboard

Customizing the ribbon is a convenient way to have all of your favorite features within reach. This is especially true if you build rapid elearning courses. Which of your most frequently used features would you add to the customized ribbon? Share your favorites by clicking on the comments link.

Events

Free E-Learning Resources

Want to learn more? Check out these articles and free resources in the community.

Here’s a great job board for e-learning, instructional design, and training jobs

Participate in the weekly e-learning challenges to sharpen your skills

Get your free PowerPoint templates and free graphics & stock images.

Lots of cool e-learning examples to check out and find inspiration.

Getting Started? This e-learning 101 series and the free e-books will help.


Articulate Rapid E-Learning Blog - building blocks of interactive elearning

Many elearning courses are linear and not very interactive. Sometimes a linear course is the right solution. However, often linear is the default solution because of a lack of resources or because the developer isn’t quite sure how to get started with interactive content.

In today’s post, we’ll break interactivity down to three simple building blocks which are the essential types of interactivity in most courses.

There’s Only So Much You Can Do to a Screen

Simply stated, an interactive course presents content that allows the user to make decisions and interact with the screen. And from that perspective, there’s only so much you can do with the screen. You can click, hover, and drag. Almost all interactivity is built on these three elements.

The first step is learning to build the three types of interactions with your elearning application and then determine when to use them. As a way to practice, I like to build simple interaction in all three modes. This way I learn to use the software and I get to experiment with screen interactions and get a feel for what works and what doesn’t.

For example, here’s a simple demo where you have to make a choice between one of two offices. The same demo is repeated using all three forms of interactivity. Take note of how the interaction feels and some of the additional instructions required for each interaction.

Articulate Rapid E-Learning Blog - three examples of interactive elearning

*You can also access the links via an iPad. This gives you a sense of how the three interaction types work on a touch device.

Which Type of Interaction is Best?

As you can see, the end result is the same regardless of the type of interactivity. This means there’s a lot of latitude in how the interaction is designed. But it doesn’t mean each type of interactivity is equally effective. Which type did you like best from the demo above?

I like the clicking because it’s more of what I’d expect from this type of interaction. However, the drag and drop version is kind of fun and novel. The hover or rollover effect seems a bit slippery to me. In some ways it moves too fast and it’s the type of thing that could move me through a course before I’m really sure where I am expecting to go.

There’s no right or wrong way to use these interactive building blocks. But there are some ways that make more sense than others. Here are a few considerations when building interactive elearning:

  • The best “interaction” is relevant content. If it’s relevant, people are less apt to require interactivity. Often we try to mask the lack of relevance with interactive elements or decision-making scenarios. But the novelty expires and interactive decision-making scenarios can be frustrating if not tied to real performance goals.
  • There’s a place for the cool interactions. You can do some neat stuff in your courses that grab the user’s attention which may help get them engaged with the content. But any novel interactivity you add to the course can quickly wear off. And what was once novel becomes a hassle.
  • Minimize interactivity by getting rid of unnecessary clicks, dragging, and mouse overs.

Learn About User Experience Design

The three interactive building blocks combined let us build all sorts of elearning courses. The key is learning to build good user experiences. A great place to start is by reading more on user experience design. Here are a few of the blogs I follow:

  • Useit.com: Jakob Nielsen writes a lot about usability and design. You’re sure to learn a lot by following this site.
  • UXMag.com: an online magazine dedicated to user experience and interactivity
  • UXdesign.com: a good collection of user experience design
  • UXMatters: an assortment of articles on understanding & designing user experiences
  • Smashing Magazine: all posts tagged with “user experience”
  • Pinterest UX board: various examples of UI and UX designs. It’s good to look at all sorts of design to inspire your own.

The links above are good for those just getting started. I have them in my RSS reader so that I’m always exposed to new ideas and discussions around designing user interfaces and interactive experiences. They’re not elearning-specific, but a screen’s a screen and whether it’s a web site or elearning course, how you interact with it is very similar.

Recommended books:

There are many good books on designing effective user experiences. Most of them are focused on web sites, but the principles are generally the same for elearning courses. The key is to understand how to design user experiences. And then from there learn to choose the appropriate interactive building block. Here are a few books that I like. If you have another good recommendation, be sure to share it in the comments section.

Articulate Rapid E-Learning Blog - recommended books on user experience design

If you can only get get one of these, I’d probably start with one of the Steve Krug books. He shows good before and after examples.

Interactive elearning is more than drag
and drops and mouse rollovers. However, if the user is going to interact with the content, then they’re going to interact with the screen which means they’re probably clicking, hovering, or dragging something across the screen. This allows them to move through the course, collect information, or make decisions.

By learning more about how and when to interact with the screen you’ll be on your way to effective interactive elearning. Of course there are a lot of considerations when building interactive elearning. And it’s not something you’ll get perfect the first time you build a course. But that’s OK. We all have to start somewhere.

Events

Free E-Learning Resources

Want to learn more? Check out these articles and free resources in the community.

Here’s a great job board for e-learning, instructional design, and training jobs

Participate in the weekly e-learning challenges to sharpen your skills

Get your free PowerPoint templates and free graphics & stock images.

Lots of cool e-learning examples to check out and find inspiration.

Getting Started? This e-learning 101 series and the free e-books will help.


Articulate Rapid E-Learning Blog - hundreds of free PowerPoint tips and tricks

I’ve been doing this PowerPoint stuff for so long that I often think the tips I share are common knowledge and everyone knows them. But every time I do a workshop, I’m reminded that what may be old to me is often new to others.

Over the years I’ve shared all sorts of PowerPoint tips and tricks. But with the blog approaching 100,000 subscribers that means there’s a lot of people who probably didn’t see many of the previous PowerPoint posts.

So in today’s post, I’ve included a list with every single PowerPoint tip shared in the blog up to this point. They include tips on creating custom graphics, assembly of interactive elearning, and getting more out PowerPoint’s features.

If you’re looking for a good resource on PowerPoint tips, this is a post worth bookmarking.

Tips on Creating Rapid E-Learning Courses in PowerPoint

Building an elearning course with PowerPoint is not the same as building a presentation. Many of the production techniques are different. This list of posts offers some good tips on building your rapid elearning courses in PowerPoint.

Articulate Rapid E-Learning Blog - PowerPoint and rapid elearning rocks, especially with Articulate Studio

Use PowerPoint for Graphic & Visual Design

PowerPoint is a versatile application that lets you build your own graphics and illustrations. This list of posts walks through all sorts of graphic design and illustration tips.

Articulate Rapid E-Learning Blog - a bunch of tutorials on creating graphics in PowerPoint

Get More Out of PowerPoint Using These Tips

Most of us probably use a small fraction of PowerPoint’s features. However, it is a very capable application. And onc
e you understand what you can do with it, it’s like having a brand new tool. The following posts dig through various PowerPoint features so that you can build rapid elearning courses and get more out of PowerPoint’s capabilities.

Articulate Rapid E-Learning Blog - free tutorials that show how to get more out of PowerPoint's features

Never-ending PowerPoint Tips

The elearning community is active in sharing tips and tricks. Many in the community create how-to tutorials in Screenr. We try to capture all of the PowerPoint tutorials we find in the community.

This link is updated every time we bookmark a new PowerPoint tutorial.

So there you have it, a career’s worth of PowerPoint tips and tricks. Of all of the PowerPoint tips I’ve shared, which is your favorite or is the most eye-opening? I’d love to know. Share it via the comments link.

Events

Free E-Learning Resources

Want to learn more? Check out these articles and free resources in the community.

Here’s a great job board for e-learning, instructional design, and training jobs

Participate in the weekly e-learning challenges to sharpen your skills

Get your free PowerPoint templates and free graphics & stock images.

Lots of cool e-learning examples to check out and find inspiration.

Getting Started? This e-learning 101 series and the free e-books will help.


Articulate Rapid E-Learning Blog - easy way to back up files to the network drive

In today’s post we’ll look at two free applications you can use to synchronize your files between your computer and a network drive or Dropbox folder.

Saving to a Network Drive

Many of you keep your elearning project files on a network drive. But working with multimedia projects from the network drive isn’t always ideal. That means you’re copying files from your network to the desktop. And ideally, you move them back over when you’re done.

Articulate Rapid E-Learning Blog - move files from the local desktop drive to your network drive

It sure would be nice if there was an easy way to make sure that the files on your desktop are sync’d to your network drive.

Working with Dropbox

Dropbox is great for syncing folders between computers. I use it all the time. But you can only sync from a folder within your Dropbox folder. So that means your project folders have to be in your Dropbox folder.

Articulate Rapid E-Learning Blog - sync your folders so they're added to your Dropbox folder

I prefer to manage my files outside of Dropbox. But I do like using Dropbox to sync my files between computers. I also prefer working outside of Dropbox when I am editing my project files. I don’t want to run the risk that Dropbox’s active syncing interferes with my multimedia production.

It would be great to have a solution that lets me work on my projects outside of Dropbox and then automatically move them to Dropbox so I have access to them on my other computers.

The good news is that there’s an easy and inexpensive way to make sure to backup your network drive or a Dropbox folder. Here’s how.

Microsoft SyncToy

SyncToy is a free application from Microsoft. You select a “Left” and “Right” folder to sync. And then you determine how and when you want to sync them.

Articulate Rapid E-Learning Blog - sync two folders using Microsoft SyncToy

The left folder is what’s active on my desktop and I sync that folder to the right folder which would be either the network or Dropbox folder.

Here’s a tutorial that shows how to set up and sync two folders using Microsoft SyncToy.

  • View the SyncToy tutorial [updated March 2022].
  • Download SyncToy [Microsoft discontinued SyncToy, but the application is available to download here].

To sync the folders, open SyncToy and select “Run.” Of course, that requires you remembering to do so, but that’s where the next step comes in.

Task Scheduler

Your PC comes with a task scheduler. It’s in the Systems Tools folder. With Task Scheduler, you schedule tasks (funny how those names work) to run at specific times.

Articulate Rapid E-Learning Blog - task scheduler is in your accessories folder

In this case, we want to create a task that opens and runs SyncToy so that the left and right folders are sync’d automatically. I schedule the task to run around 7:00 PM when I am mostly done with work and usually not at my desk.

Articulate Rapid E-Learning Blog - how to set up task schedule to run SyncToy

You can learn more about Task Scheduler here. There are a lot more options, but for this post I kept it really simple.

  • View the Task Scheduler tutorial [updated March 2022]
  • Access Task Scheduler from windows: Start > Accessories folder > System Tools folder

Let’s review the process:

  • Create a folder on your PC for elearning projects.
  • Create a folder on your network (or Dropbox) that will sync with your PC folder.
  • Use SyncToy to synchronize the two folders.
  • Automate syncing the two folders using Task Scheduler to run SyncToy at a scheduled time.

That’s about it. It’s an easy process and great way to make sure that what you have on your PC is sync’d with your network files and Dropbox. It sure beats having to manually copy things back and forth.

Events

Free E-Learning Resources

Want to learn more? Check out these articles and free resources in the community.

Here’s a great job board for e-learning, instructional design, and training jobs

Participate in the weekly e-learning challenges to sharpen your skills

Get your free PowerPoint templates and free graphics & stock images.

Lots of cool e-learning examples to check out and find inspiration.

Getting Started? This e-learning 101 series and the free e-books will help.


Articulate Rapid E-Learning Blog - branding requirements for elearning & PowerPoint

Many organizations have rules on using PowerPoint. But there’s a difference between elearning courses and slide presentations. How you use PowerPoint and its features is different; and so is the output. The only thing that’s the same is the application.

However, it never fails that once someone knows you’re using PowerPoint to build the rapid elearning course, they apply the same rules to your elearning course that they’d apply to presentations. And that causes issues.

PowerPoint is a Diverse Tool

Despite all of the complaints about PowerPoint it’s a very diverse product that is used to create everything from vector illustrations to elearning courses. The goal shouldn’t be to force a single guideline to all uses of PowerPoint. Instead it should be to clarify the final product and its objectives and THEN apply the appropriate guidelines.

Articulate Rapid E-Learning Blog - use PowerPoint to create videos and rapid elearning courses

See the demo above.

Essentially PowerPoint is neutral. When it comes to presentations, it’s a blank slide waiting for content. But for creating an illustration, it’s a stage to assemble objects. And for elearning it’s a multimedia screen used learning.

But here’s the problem. Once your client knows you’re using PowerPoint to create the rapid elearning courses all bets are off. Instead of developing guidelines based on the output and objectives, they create restrictions based on the application being used, in this case PowerPoint.

That means they force the same requirements on your elearning courses that they force on presentations. And that’s not a good thing.

PowerPoint Branding Requirements

Many organizations have branding requirements when it comes to the use of PowerPoint. This makes more sense for public facing presentations. But the requirements for a presentation are not the same for elearning.

While there are many similarities between a presentation and elearning course, there are also many differences. In a presentation, the slide is all you see. Thus if you need to reinforce visual branding requirements, all you have is the slide area to do so.

Articulate Rapid E-Learning Blog - do you want your branding desing to take up all of your elearning screen

But in an elearning course, the slide is for content and all of the real estate is valuable. In addition to the screen, the elearning course also has a player. If there are visual branding requirements, that’s the best place to put the logos and custom color schemes. It fulfills the requirement of the branding interests and it frees up valuable real estate.

Articulate Rapid E-Learning Blog - how to minimize branding in your rapid elearning courses

When I managed a team of Flash developers I rarely ran into the same branding requirements that I did when using PowerPoint. Why is that? They’re both blank screens. The final output is Flash. But PowerPoint comes with a built-in bias. And most clients don’t know much about Flash. So they trust your expertise.

I tell my clients that if they have any PowerPoint content to give it to me as is. As far as they know, they’re just handing off content. I don’t need to tell them all the details of the production process or that I will be working in PowerPoint to produce the course. All that really concerns them is that they get the best elearning course possible.

However, if they do find out that I am using PowerPoint, then I have to deal with many of the branding issues that I’d never have to deal with if I were working in Flash.

Here’s my advice:

You can set expectations based on the details you provide. Does your client need to know how you create the course?

Don’t tell your client that you’re using PowerPoint if they don’t already know. They probably don’t care anyway. Just let them know you’re going to deliver a Flash-based course. If there are branding requirements, they can be built into the Player skin and color schemes.

Subject Matter Experts

Many elearning courses come from pre-existing classroom content. And most of it was initially created in PowerPoint. That means someone (usually a subject matter expert) spent a lot of time creating those slides.

They’ve organized the content and picked their templates. They’ve included the clip art and fonts that they like. And often they’re reluctant to change anything. If it worked in the classroom why shouldn’t it work online?

Articulate Rapid E-Learning Blog - don't let your subject matter experts control how the elearning course looks

When I used Flash to build elearning courses, I never had to deal with any issues concerning the original visual design of the classroom content. The subject matter experts accepted and expected that the elearning output was going to be different. They never insisted that I keep their wacky fonts and templates.

However, that would change immediately once they knew that I was using a PowerPoint-based application like Articulate Presenter. Then it was like pulling teeth to get them to concede changes. Most of this could have been avoided if they never knew that I was using PowerPoint to create the final elearning courses.

Here’s my advice:

Don’t tell the subject matter experts that you’re using PowerPoint. Do they need to know what tool is used to create the final courses? What matters is that you deliver the course on-time and that it meets the organization’s needs.

The ultimate goal is to create and deliver effective elearning. You’re going to get content from all sorts of sources and in many formats, with PowerPoint being the most common. That’s OK.

But because you get the original content in PowerPoint doesn’t mean you need to advertise that you’ll also be using PowerPoint to create the final product. Does it really matter if the client knows how you’re creating the course? If not, why introduce an issue that can throw a wrench into the production process?

How do you deal with PowerPoint branding issues when it comes to building rapid elearning courses? I look forward to hearing your thoughts. You can share them by clicking on the comments link.

Events

Free E-Learning Resources

Want to learn more? Check out these articles and free resources in the community.

Here’s a great job board for e-learning, instructional design, and training jobs

Participate in the weekly e-learning challenges to sharpen your skills

Get your free PowerPoint templates and free graphics & stock images.

Lots of cool e-learning examples to check out and find inspiration.

Getting Started? This e-learning 101 series and the free e-books will help.