The Rapid Elearning Blog

Archive for April, 2012


The Rapid E-Learning Blog - how to manage graphics in elearning course

I’ve been on the road a lot lately doing elearning workshops and Articulate jam sessions. After the sessions I usually get some really good questions that are probably common to many of us. Today, we’ll look at how to manage the images used in elearning courses.

Essentially there’s no right or wrong way to manage your images. Do what works best for you and your team. Here are a few ideas:

Be Consistent in How You Manage Course Files & Assets

We can waste a lot of time looking for images and assets that are spread across multiple computers and network drives. To help alleviate that, I start each elearning course with a generic folder. It already has a predefined project structure so I’ll always know where my image files are located regardless of the project I access.

The Rapid E-Learning Blog - create a consistent elearning course folder

When I start the project, I duplicate the generic folder and title it with the project name. After that all of my assets and project content go into the proper folders. This helps make the process consistent which comes in handy if you share files with others

You can get more detail in this blog post on organizing your elearning project files. There’s even a quick workshop tutorial that explains it in a bit more detail.

The Rapid E-Learning Blog - elearning tutorial

Click here to view the tutorial.

Use a Photo Management Application

Picasa or Windows Live Photo Gallery (both free) will scan your hard drive and locate images. They create a nice panel of thumbnails.

I like these programs because the thumbnails give me a quick visual reference of the images and then simple access to folder. And I can tag the images so they’re easier to search and locate later.

The Rapid E-Learning Blog - quick visual reference of elearning graphics in Picasa

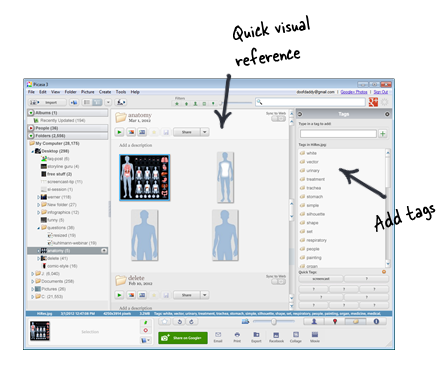
It takes a little time to get the images tagged, but once done, you’ll save a lot of time looking for what you need.

I usually start by tagging based on the project name. This keeps it simple. I find I don’t access the images that frequently after the project’s done so no need to go overboard initially. Over time I add more details to the images as I get to them.

Another bonus to these products is that they do some simple image editing. Check out the Photo Fuse feature in Windows Live Photo Gallery (could the name be a little longer please). It’s pretty slick and could come in handy if shooting your own stock photos.

Microsoft’s Clip Organizer Does Everything You Need

Almost everyone has access to Microsoft’s Clip Organizer, but we rarely use it. However, it lets you easily organize and manage your elearning assets. And it’s free.

The Rapid E-Learning Blog - manage images in Microsoft Clip Organizer

I like that the Clip Organizer already does a lot of the tagging because it pulls from the project folder and file name. If you get in the habit of adding descriptive titles and folder names, you will make tagging and locating your images super easy.

The Rapid E-Learning Blog - manage images in Microsoft Clip Organizer

Here’s a previous post where I discuss how to save time when working with elearning graphics. There are also three tutorials that show how to get more out of the Clip Organizer. For quick access to the Clip Organizer, I added a shortcut to my desktop.

One of the things I like about the Clip Organizer is that it’s not limited to Microsoft applications either. I can drag and drop the images to any other application that uses them.

Manage Your Image Files After the Fact

Most of the times when I look for photos that I’ve used in the past, it’s always based on a previous project. For example it’s less, “I need a guy in a business suit” and more “I used a guy in a suit in that finance course. We can use that image.”

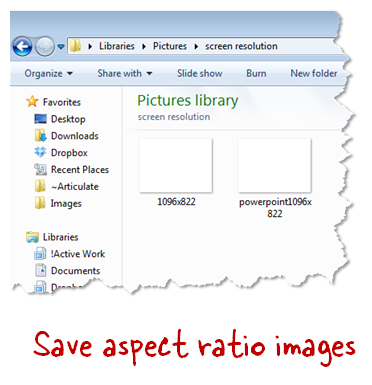
The problem is that I have to dig through the previous course assets to find the image. Sometimes the image folder contains a lot more images than the ones I used. It would be great to just have a folder with ONLY the images used in the final course.

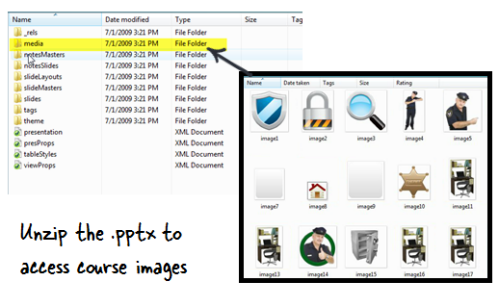
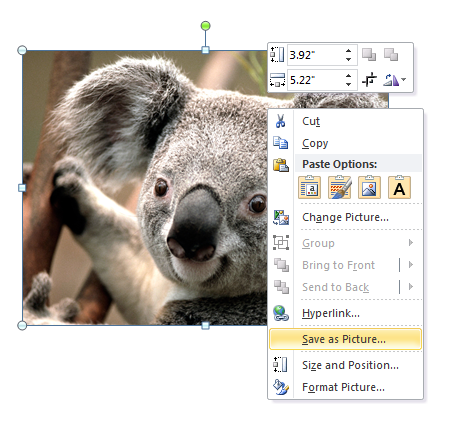
That’s possible! In PowerPoint 2007+ you can unzip the .pptx file; and inside the PowerPoint file folder you’ll locate a media folder. This media folder has all of the images used in your PowerPoint file.

Pull the media folder out and save it with the course name. Now you have a single media folder with the course media assets. So you’ll always have quick access to only the images you used in your rapid elearning course.

The Rapid E-Learning Blog - locate media folders in PowerPoint .pptx files

I use 7-Zip which is a free application that lets me extract the contents of the PowerPoint file. You can learn more in this blog post on unleashing your elearning graphics in PowerPoint 2007.

Here’s a simple tutorial where I walk through the process in more detail.

The Rapid E-Learning Blog - 7-Zip demo elearning course

Click here to view the tutorial.

I’ll have to be honest. When I work by myself, I don’t always follow my own advice. And it always comes back to haunt me because somewhere down the road I have to share the files with others. So getting in the habit of managing your files is a good thing that will save time and frustration.

There are all sorts of ways to manage your files. Regardless of how you do it, the key is consistency and agreeing on a process that works for you and your team. The less it intrudes on how you work, the more success you’ll have.

How do
you manage the graphics you use in your courses? Feel free to share your thoughts by clicking on the comments link.

Events

Free E-Learning Resources

Want to learn more? Check out these articles and free resources in the community.

Here’s a great job board for e-learning, instructional design, and training jobs

Participate in the weekly e-learning challenges to sharpen your skills

Get your free PowerPoint templates and free graphics & stock images.

Lots of cool e-learning examples to check out and find inspiration.

Getting Started? This e-learning 101 series and the free e-books will help.


One of the topics we cover in the elearning workshops is how to quickly create templates to help move the elearning courses out of that PowerPoint look.

At a previous workshop someone wanted to see how this was done so we created one quickly in class. I like to do these templates because they help bring out a few ideas.

Ideas to Inspire Your Creativity

Most of us aren’t graphic designers and we struggle to come up with a nice looking design. One way to work around that is to be inspired by those who have graphic design skills.

As a habit, I like to review website designs for ideas. I learn a lot about layouts and how the designer is using color. I can apply these ideas to my elearning courses because when it comes down to it, a web pages and elearning screens are going to have the same visual elements like text, objects, colors, and pictures.

Develop Technical Proficiency

I’ve shared many templates and illustration ideas over the past few years. While the actual templates work for some of your projects, the main point is less about the actual output and more about developing technical proficiency with the tools you have. In this case, I mostly use PowerPoint.

With each template I try to reinforce some design ideas and techniques that you can use in PowerPoint to create your own templates or illustrations. If you can use the ones I give away, that’s cool. But hopefully you’ll take the time to practice some of the techniques so that you develop more proficient skills in PowerPoint.

Here’s a template we built in the workshop. The inspiration came from a template we quickly found on the template monster website.

The Rapid E-Learning Blog - inspiration for elearning template

I liked the circular layout and the dark background. I also liked that the background is patterned because that lets me show a few extra design tips when using PowerPoint.

The Rapid E-Learning Blog - PowerPoint elearning template

Above are the layouts we quickly developed in the workshop. As you can see, they look similar, but they’re not verbatim. I try to keep as much space open for content as I can so I didn’t use the larger circle layout from the template monster template.

PowerPoint Production Tips

Here’s an example of the template in action. If you want to use it, you can download it here.

Click here to view the demo.

After previewing the template, check out the production tips below. They’ll help you save time the next time you build a rapid elearning course.

Create textured backgrounds by layering transparent images. Create shapes and fill them with gradients, colors, or patterns. Then vary their transparency. Sit them on top of each other and you can create all sorts of effects.

Use the selection pane to control layers and name objects. Starting with PowerPoint 2007 there’s a selection pane that allows you to see the layered objects. You can show/hide them for quick access.

The Rapid E-Learning Blog - manage shapes in PowerPoint with selection pane

It’s a good habit to name them so that you can easily locate the objects. This is especially true if you leave the project for a while and come back in. Sometimes it’s hard to know what’s what. By naming the objects you’ll save time and get back up to speed quickly.

Add hyperlinks as objects and not on the object. If I use a hyperlink, I try to create a rectangle for the link rather than put the link on the object itself. The reason I do this is because I can identify the links on the slide.

The Rapid E-Learning Blog - create hyperlinks on objects in PowerPoint

For example, if I put a link on a circle shape. How do I know the link is there without looking for it? But if I create a shape just for the link, then I know that there’s a link on the slide. Going to the point above, I also title the link in the selection pane so it’s easy to find.

In PowerPoint 2010, you can create custom shapes by combining shapes or using one to punch out a shape from the other.

The Rapid E-Learning Blog - create custom shapes in PowerPoint 2010

In the example from the template, I created a circle that extended way past the borders of the slide. So I used a rectangle and the shape subtract feature to cut off all of the shapes that were hanging over the slide edge.

Customize the ribbon for quick access to common PowerPoint features. Again starting in PowerPoint 2010 you can customize the ribbon toolbar to create your own shortcuts.

The Rapid E-Learning Blog - customize the ribbon in PowerPoint 2010

For example, the shape editing features that I mentioned above are not readily available. So you need to find them and add them to your toolbar. If you find that you use the same features quite a bit, create your own tab so that all of the common features are in one location. It probably is a good idea to create a “Rapid Elearning” tab with all of your favorite features.

There are a lot more PowerPoint tips and tricks that will help you build better elearning courses. Hope you enjoy the template. What’s your favorite PowerPoint tip? Feel free to share it by clicking on the comments link. Or better yet, create a quick Screenr so we always have access to your tip.

Events

Free E-Learning Resources

Want to learn more? Check out these articles and free resources in the community.

Here’s a great job board for e-learning, instructional design, and training jobs

Participate in the weekly e-learning challenges to sharpen your skills

Get your free PowerPoint templates and free graphics & stock images.

Lots of cool e-learning examples to check out and find inspiration.

Getting Started? This e-learning 101 series and the free e-books will help.


I get a lot of requests for software demos and quick tutorials. I also do quite a few webinars. Because of this, I am always figuring out just the perfect screen resolution for my software applications.

Another challenge is that most screencasts are recorded at a higher resolution than used in the elearning courses. You may record a full screen demo and then have to squeeze it down to something like 1024×768. And any time you scale a screencast down you’ll run into some image degradation.

The Rapid E-Learning Blog - common screen resolutions

The good news is that as monitors get bigger scaling down won’t be as much an issue. As you can see in this post, 85% of the monitors have a screen size larger than 1024×768.

Ideally we can scale the software down to the desired recording resolution. But that’s not always possible. Some software has restrictions on how much you can scale the window down. They do this because if you scale too much the user interface gets messed up and makes it difficult to use.

The Rapid E-Learning Blog - user interface is not ideal

Above is an example of a PowerPoint screen scaled down to fit in a small recording window. As you can see, the user interface is trashed. While the software is functional it is not what the end user sees when they open up the application.

I have similar concerns when I do webinars and share application screens. During those I have to determine the best size to share the software. I like to keep the size of the applications the same. This way when I am switching between applications it’s as seamless as possible and the person watching the webinar doesn’t have to resize the viewing window.

Following is a simple trick that I use to quickly get my various software applications to the right size whether I’m doing a screencast or webinar.

Create an image file that represents the screen resolution you need. When you want to record a quick screencast or share an application, set the image as your desktop image. After that, place the application on top of the image and scale it to fit. Then draw the recording window around the application.

I have all sorts of preset images that I can switch depending on the software I need to share.

Here’s an example of what I do:

Let’s suppose I am recording some PowerPoint tutorials. I’ve played around with some settings and realize that I can get the best looking UI if the window is 1096 pixels wide. I also want the window to be 4:3 aspect ratio.

So I need to figure out what the proper dimensions are for a 4:3 aspect ratio that is 1096 pixels wide.

Calculate the 4:3 aspect ratio using the 1096 width. I use the aspect ratio calculator. A 4:3 aspect ratio starting with 1096 is going to be 1096×822.

The Rapid E-Learning Blog - aspect ratio calculator

Create a graphic that is 1096×822. I prefer a solid white graphic. You can make it a few pixels bigger if you like so there’s a margin when you record.

The Rapid E-Learning Blog - create a blank image for the desktop

Save the image as 1096×822.png or powerpoint.png. I like to save by application name so it’s easier to locate.

The Rapid E-Learning Blog - save images by application name or resolution size

Set the image as your desktop image when you’re ready to record. And then make sure it’s centered.

The Rapid E-Learning Blog - set image as desktop image

Place application over desktop image. Anytime you want to record an application, select its matching display image and then you can quickly align to the box. I find this really helps when I record with Screenr or when I do webinars.

The Rapid E-Learning Blog - place application over teh desktop image

That’s basically it. You create an image of a certain size and then anytime you want to do a screencast, switch your desktop background to the image and center it. Place your application over the image and you’re all set.

I’m always switching between applications and screencasting products like Screenr and Storyline. So I find this works well for me.

Bonus Screencasting Tips

The Rapid E-Learning Blog - add a logo and custom brand to screencast tutorials

  • Create an image that’s off to the side. This works great for webinars or screensharing where you can select an area of the desktop to show. Select the image area and then slide the applications in and out without having to worry about resizing the applications. Here’s a tutorial that explains how.

The Rapid E-Learning Blog - create a wide desktop image for screencasts and webinars

These tips should help if you want a simple way to quickly set up your desktop applications for sharing whether through a screencast or webinar.

Events

Free E-Learning Resources

Want to learn more? Check out these articles and free resources in the community.

Here’s a great job board for e-learning, instructional design, and training jobs

Participate in the weekly e-learning challenges to sharpen your skills

Get your free PowerPoint templates and free graphics & stock images.

Lots of cool e-learning examples to check out and find inspiration.

Getting Started? This e-learning 101 series and the free e-books will help.


The Rapid E-Learning Blog - You Need to Know These Seven Tips if You Build Graphics for E-Learning

If you’re building elearning courses, then you should expect to have a graphics editing program as part of your tool chest.  In a previous post I mentioned a few free (or low cost) graphic editors if you don’t already have one.

The Rapid E-Learning Blog - free graphic editors

There’s even a good discussion about graphics applications in the elearning community. Jump in and share a favorite of yours.

There’s a difference between having a graphics application and being a professional graphics artist. Many of us work alone and have to do our own graphics. I find that what I do for graphics doesn’t require overly sophisticated skills.

While we may be using different tools, there are some simple graphics editing we should all be able to do.  Let’s review a few of the common image editing tasks.

For my demos, I decided to stick with PowerPoint to show that if that’s all you have, then you still can do quite a bit. If you use a different tool, look over the list and see if you can do them with the application you use.

How to Remove Backgrounds

PowerPoint 2010 comes with a background removal feature which makes it really easy. Select your image and click on Remove Background. At that point you can mark areas to keep and areas to remove.

The Rapid E-Learning Blog - how to remove backgrounds in PowerPoint

Older versions of PowerPoint have a simple feature that lets you make a single color transparent. To remove a background, create a colored shape that sits over the picture. Group the shape and picture. Then copy and paste it back in as an image using Paste Special (.png). At this point you can apply the transparency to the single color.

The Rapid E-Learning Blog - how to remove backgrounds in PowerPoint 2003 and 2007

Click here to view a tutorial.

How to Use the Drawing Tools

No doubt you’ll have to create shapes and boxes. Most image editing applications allow that. Learn to create shapes and then embellish them with colors, shadows, and dimension.

The Rapid E-Learning Blog - how to use the drawing tools in PowerPoint

In PowerPoint, add a shape to the slide. Right click on it and you’ll see the format shape option. This opens up a box that displays everything you can do with the shape. In PowerPoint 2010, you can combine shapes to create custom shapes.

Once you learn to use the drawing tools in your image editor you can create all sorts of custom graphics, even if all you have is PowerPoint.

Here are some tutorials that demonstrate how to create various objects in PowerPoint:

You may never need the specific objects, but the more you do these things that much more you’ll be fluent working with PowerPoint.

How to Work with Layers

Creating a graphic with a single layer can be a challenge. Most graphics editing applications layer their images. This way you can isolate your editing to smaller pieces.

In the past working with layers in PowerPoint was a real pain. With PowerPoint 2007 that changed. Open the selection pane to see a layered view of the objects on the slide. From here you can change their order, title them, and make them visible or not.

The Rapid E-Learning Blog - how to work with layers in PowerPoint

Click here to view the tutorial.

How to Create Shadows

Drop shadows separate the objects from the screen. This adds depth and dimension to the image.

PowerPoint comes with some shadow features. Those are easy enough to use. Select your object and then apply the shadow to them. Starting with PowerPoint 2007, you have a lot more sophisticated shadows with which to work.

The Rapid E-Learning Blog - How to create drop shadows in PowerPoint

Click here to view the tutorial.

But what if you want to create your own shadows? That’s easy enough. Just add matching sized shape to create the shadow. Then do some basic edits like:

  • Fill it with gray or black and set it behind the picture.
  • Make it partially transparent to soften the color.
  • Apply a soft edge (PowerPoint 2007+) to the shadow to make it seem more natural.
  • Edit the points on the shape so that it’s a bit more organic and less straight.

How to Resize Images

Resizing images in PowerPoint is pretty simple. Select the image and then drag one of the anchors to size it. If you right click on the image, you’ll get access to the Format Picture window where you have a bit more control to fine-tune the sizing.

The Rapid E-Learning Blog - How to resize images in PowerPoint

I see a lot of images that are skewed a bit because they get pulled from the middle anchors on the side or top. If you hold SHIFT and then click and drag from the corner, the image will scale up or down without changing its aspect ratio.

Click here to view the tutorial.

How to Crop Images

Cropping is one of the features I use most when editing my graphics. PowerPoint 2010 makes cropping that much easier because it acts more like an image mask
than just a cropping feature.

The Rapid E-Learning Blog - How to crop images in PowerPoint

Click here to view the tutorial.

How to Export Images

Once you create an image you’ll need to save it. There are all sorts of image formats. This post explains the formats in a bit more detail. But here’s a basic run down.

Generally you have two types of images. One is a bitmap filled with pixels. The number of pixels never changes. When you scale it up, the pixels become larger and that’s where you start to lose image quality.

The other type of image is vector. All of the shapes and lines are built on a mathematical formula. So when you scale it up or down you don’t lose image quality. Most clip art is vector-based.

The Rapid E-Learning Blog - How to save as images in PowerPoint

I typically save my images as .png files. What I like about the .png format is that I get a good spread of colors so the images look rich; and I can make parts of the image transparent.

When working in PowerPoint, you have a few options. Create your shapes or custom images. When finished right-click and save as an image.

The Rapid E-Learning Blog - Save as picture in PowerPoint

Click here to view a tutorial.

Or you can treat your entire slide as your image. In that case, save the presentation as an image file. If you do this, keep in mind, you’re not limited to the default aspect ratio in PowerPoint (4:3). You can always change the slide size to whatever size you need. For example, if you want an image that looks more like a banner, change the slide properties to dimensions that are better suited for a banner image.

If you use PowerPoint to edit your graphics, then these tutorials should help. If you use something else you’ll need to look for some tutorials for your application of choice.

Obviously there are a lot more things you can do with your graphics editor. What are some of the more common features you use? Feel free to share them by clicking on the comments link.

Also, if you want to create a series of Screenr tutorials showing these steps in the graphics application you use, send me the links and I’ll add them to this post.

Events

Free E-Learning Resources

Want to learn more? Check out these articles and free resources in the community.

Here’s a great job board for e-learning, instructional design, and training jobs

Participate in the weekly e-learning challenges to sharpen your skills

Get your free PowerPoint templates and free graphics & stock images.

Lots of cool e-learning examples to check out and find inspiration.

Getting Started? This e-learning 101 series and the free e-books will help.


The Rapid E-Learning Blog - ewear fashion for elearning success

One of my favorite parts of going to elearning conferences is meeting so many of the industry’s thought leaders. During my recent trip to the Learning Solution Conference in Orlando I ran into one of my mentors and a real elearning pioneer, Dr. Werner Oppelbaumer.

I was able to get some time with him for a brief interview. We discussed the industry and where he sees things going. I also asked for a sneak peek at some of his innovative technology research.

The Rapid E-Learning Blog - Dr. Werner Oppelbaumer discussing the future of elearning

Lots of elearning people are using Twitter. What do you think about Twitter and social media, in general?

Werner: I am a big fan of social media, especially in the work place. It’s a great way to keep lazy people busy. They used to distract others with their long water cooler conversations and endless barrage of help for every little thing. This impacted the bottom line because they consumed the time and resources of more productive people.

Now with Twitter they are able to sit at their desks and feel like they are making an important contribution to humanity as they share all the important information that busy people are missing because they are working.

Ok…let’s talk about opportunities. What are you excited about?

Werner: Even if times are tough there are always opportunities. We’ve seen lots of improvement in our industry with technology like rapid elearning tools.

But learning is much more than multimedia technology. For years we’ve focused on desktop technology and then we looked at mobile. But what have we missed?

Clothes! And it’s been there right in front of our eyes for years.

We hypothesized that most people wear clothes when participating in an elearning course. And our studies have proved us right. Based on our findings, 87% of elearners wear clothes while taking their courses. Surely there’s an opportunity there with this huge untapped market.

The Rapid E-Learning Blog - people wear clothes while taking elearning courses

We did some digging and sure enough, there is ample opportunity. Our studies are showing a direct correlation between successful knowledge transfer and what people wear. There’s a lot to learn about the emotional connection between clothing and the learning experience.

We immediately began to prototype some ideas that we think will push our industry forward. Here’s a quick tour of what we are currently working on in our research labs.

The Rapid E-Learning Blog - Dr. Werner Oppelbaumer research labs presentation for elearning wear and mobile learning

Click here to view the research lab demo.

That’s fascinating. Thank you Dr. Werner for sharing your expertise and letting us take a sneak peek at the future of elearning.

Events

Free E-Learning Resources

Want to learn more? Check out these articles and free resources in the community.

Here’s a great job board for e-learning, instructional design, and training jobs

Participate in the weekly e-learning challenges to sharpen your skills

Get your free PowerPoint templates and free graphics & stock images.

Lots of cool e-learning examples to check out and find inspiration.

Getting Started? This e-learning 101 series and the free e-books will help.